The audio model is used to render HTML 5 audio tags such as the following:
<audio controls>
  <source src="myAudio.mp3" type="audio/mpeg">
  <source src="myAudio.ogg" type="audio/ogg">
  <p>
    Your browser doesn't support HTML5 audio.
  </p>
</audio>
To generate an audio tag you first define the files and options for the tag using the audio model, then you can render the audio tag on any webpage by using the $audio function.
Uploading Audio Files
Audio tags reference audio files that must be created in advance of using the audio model. The audio model supports three different audio file formats. It is generally a good idea to convert your files to all three formats in order to support the most number of browsers and devices. At a very minimum, we recommend creating an mp3 file since most devices support this format. Once you have the audio files stored on your local device, you can proceed to upload them to your server by following these steps.
After opening a new audio model, click on the magnifying glass next to the audio file you want to upload.

This will pop up a window that allows you to select a file from the site's public audio folder. If you have never uploaded an audio file before, you may get a warning indicating that the audio folder does not exist. This should be followed by another message indicating that the folder was created as shown here:

Since the audio folder had to be created, it clearly contains no audio files from which to select. You must proceed to upload the files in order to select them. To do so, click on the Choose Files button and navigate to the local folder that contains the audio file(s) that you want to upload.
You can hold down the shift key to select a range of files or hold the ctrl key to select files one at a time.

After clicking the open button, you will be returned to the list page where you can click on the Upload Files button.

After your file has been uploaded it should appear in the list to be selected. Select the file to be returned to the audio model.

If your audio file is available in several different formats, you can repeat the above process for the other file formats that you want to support.
Transcripts
Transcripts allow you to associate written text with your audio files. This is helpful for SEO purposes as well as serving those who are hearing impaired.
Begin by creating a transcript file in notepad or some other text editor and save this as a .txt file. When you click on the magnifying glass next to the transcript file name you will be able to upload this text file just like you did with the audio files as we see here.

You can also specify the width, height and placement of the audio transcript. These settings can differ for phone vs. desktop devices.
Other Settings
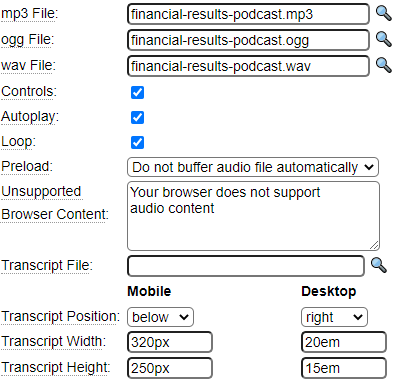
Refer to the HTML 5 audio tag specification to learn about the other options that can be specified for an audio tag and set these as desired. Here we see all of the possible audio options are set:

When you are finished, stow the specification under the desired name.
Rendering the Audio Tag
Audio tags are rendered using the $audio function. Let's suppose the above specification was stowed under the name financial_results, we could render this component within the tags model using the following dollar function.

The $audio function also allows you to pass additional properties of the audio tag if required.
When we look at this page in a web browser we will be able to play the auto file and scroll the transcript file as shown: