The db_table_browse model is used to generate a browse/query page to show a set of SQL database table rows and to allow the user to position the browse results to a desired starting value. This model allows you to create an efficient browse screen for almost any table without writing any code by hand.
If you are unfamiliar with how browse pagination is performed or the difference between key fields and filter fields please read the following help before proceeding:
Follow this link to learn how to set up browse helproutines.
For our first example, consider the following partial data model:

As we can see there are related three tables.
The address table stores individual street addresses. These addresses don't include a textual city name but, instead, point to a city that is stored in a separate city table. The city_id is used to link these addresses with their cities.
Similarly, the city table includes a country_id column to link it to a specific country name.
Finally, the country table is a stand-alone table that contains one row for each defined country.
Now let's look at a browse program intended to browse addresses:

We can tell by looking at the page that the browse has been defined with two key fields and two filter fields. Generally, users of this screen would enter the information that is known. In this case, country is a required field so this must be provided. If the postal code was also known the user could easily fetch a list of addresses having the supplied postal code. In this example, the user has entered a starting city and results show the cities starting from the supplied city Aurora. Since the key fields are City and Address, the results will always be returned in this order.
Now let's look at how we specified this browse page using the db_table_browse model.

Schema
The schema is only necessary of this differs from the default schema defined in site settings. This identifies the database where the table being browsed is location.
Table
Enter the primary table being browsed.
Fetch Count
If this is a number, the supplied number will be used as the number to be fetched in all cases. For small tables, or tables that are constrained by passed values, enter -1 if you always want to fetch all rows. Any other value must be defined as a select definition (generated using the select model). The selector should allow the user to choose the number of rows to be fetched.
If you leave this value empty, the fetch count will default to the Auto Fetch count (described next). If the Auto Fetch count is also empty the default fetch count will be taken from the config value shown here.

Auto Fetch
Under some conditions you can automatically fetch records when the page is first loaded (before the user interacts with the form). To activate this feature, indicate the number of rows to be fetched. You can enter -1 to fetch all rows (this should only be done for small tables).
Auto Fetch Condition
This field is activated when the Auto Fetch property is set. If you are browsing a table with a small number of rows, you may want to auto fetch the rows unconditionally to save the user the trouble of submitting the form again to fetch the rows. For tables with many rows, auto fetching the first set of rows is generally not recommended since there is a low probability that the pre-fetched rows are going to be the rows of interest to the user. Of course this also depends on the nature of the data. If the browse returns information by date, it could be the case that the rows with the most recent date are going to be of interest, even if there are a lot of rows in the table. In such a case, fetching the first 10 or 20 rows may make sense.
The drop down allows you to specify the conditions under which the auto fetch should occur. In most cases you will only want to auto fetch if certain search values or filters are supplied in the query string. Choose the option that is most appropriate for your situation.
Maximum Fetch Limit
This is used to prevent more than a certain number of rows from being fetched per request. It is usually a good idea to place an upper limit on your queries to cap the amount of resources a given browse request can consume. It is important to understand how your users will use the data to decide where to set this limit. If you anticipate that users will need to see a lot of records to answer their questions you should set this limit fairly high so that they don't need to have to fetch many small batches.
Crawlable Next
This field is important for search engine optimisation so it really only pertains to browse functions that are available on a public internet and only if you want the data contained within your browse tables to be indexed by search engines. In crawlable next mode, the next button is rendered as a link that can be crawled by search engines and the data is passed back to the browse object via the browser query string. If crawlable next is not selected, data is passed back to the browse using a post request. The same browse can be used as a stand-alone query as well as a helproutine that is intended to pass a selected value back to the calling form. It is possible to make the non-helproutine version crawlable while the helproutine version of the same page is not crawlable.
Input Components Per Row
Normally each input (key or filter) is entered on a separate row. This parameter can be used to request that several fields are to be placed on each row.
Custom Form
By default, the form used to input the key and filter fields is built on-the-fly. If you are not happy with the look or feel of the standard input form you can develop a custom form. Before making a custom form it is a good idea to try the function using a standard form. This will tell you what fields need to be added to your custom form. Enter the name of your custom form in this field.
Group Label
If you want you can place a group around the browse contents (inputs and output rows) enter the descriptive name to be used for the group.
Table Properties
Internally, and HTML table is used to render the form to collect the input values and show the results. Use this field to set any properties to be associated with this table.
Joins
Indicate any tables to be joined to your primary table. In our example we are browsing the address table however we also want to show the names of the city and country to which the address belongs. Therefore, it is necessary to include a table join to incorporate fields from these tables. Here is our join option:
left join city on city.city_id = address.city_id
left join country on country.country_id = city.country_id
Having
If your SQL requires a Having clause enter this here. This is generally used to include aggregate functions not supported by the SQL Where clause.
Distinct
Check this box if you only want to return one row for each unique key.
Special Key Handler
On rare occasions you may need special handling to assign key and filter values dynamically. In such cases it is necessary to write a PHP class that supports one or more of these methods:
- initialize_key_definitions($key_info) can be used to change the key definitions.
- before_input_processing($key_info, $key_values) can be used to change the key values.
This should return true or an error message to be shown.
Default Wildcard Support
Leave this option blank to default to full wildcard support. This will allow users to enter special characters in the search values to specify lists, ranges, prefixes, etc. To not allow any wildcard characters enter !. To allow certain wildcard characters provide a comma-delimited list of wildcard options to be supported from eq,ne,gt,lt,range,prefix,null,!null,list
Render As
By default, browse results will be rendered using the datatables framework. This framework allows local navigation and searching of the fetched results as well as drill-down features. If you wish to render the results using a plain HTML table, choose html_only.
Multilingual Support
If your browse program is intended to support users in different languages you will want to use the Multilingual Prompts and Headings features

In the Default Label and Default Heading fields enter : (colon) to use simple translated prompts and ? (question mark) to use translated prompts that include popup help. In the Default Heading field you can also override the translation column to be used by specifying a column in square brackets after the : or ?. For example, ?[heading] would use the heading column of the translation class rather than the default label column.
Indicate the translation class to be used or check the box to default the translation class to coincide with the table name of the field being translated.
Specifying Key and Filter Fields
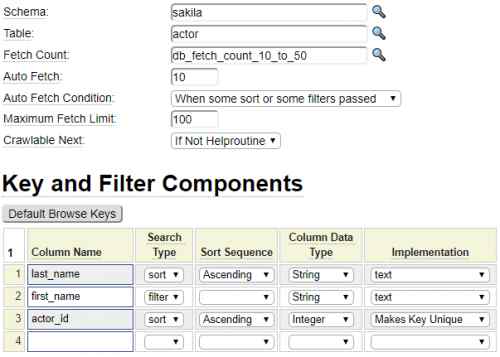
Recall that keys are used to determine the order of the rows being returned. Users can enter a key to "jump" to any point within the table being searched. Further note that filters allow the user to only return rows that match a certain set of values. Let's look at an example of keys and filters for out Address Browse example.

Notice the button labelled Default Browse Keys. If you are creating a new browse class from scratch you might want to click this button to allow the db_table_browse model to default the keys based on which fields are defined as keys in the database.
DB Table Name
Notice that two of the fields are taken form the primary file (address) so there is no need to enter a Table Name for these fields. On the other hand, since country_id belongs to the country table being joined we need to identify this table. This is also the case for the city field which comes from the city table.
Column Name
The column name must exactly match the name of a column on the table specified or if no table is indicated it must be on the primary browse table. While there is no requirement for the keys and filters to be implemented as keys in the database, this is strongly recommended to improve performance.
The order that you enter the fields will determine the order in which the fields will appear on the rendered form shown to the user.
The blue box surrounding each of the Column Name cells indicates that you can double-click in the field to get a list of columns available for the table being browsed.
Search Type
Notice that the search type of key fields is "sort" whereas the filter fields use type "filter". Note that in most cases, the combination of all key fields must result in a unique key value, for more information related to this please refer to the Implementation section below.
Sort Sequence
By default, the rows will be returned in ascending sequence according to the sort key values. If required, you can use the Sort Sequence column to change one or more keys to descending. This column can also be used to "lock" a value. That is, to only show rows where the key column has one specific value. The lock value can either be entered by the user or it can be supplied in the Locked Value column to the right of UI Properties (not shown).
Label
The Label column can be used to override the prompt to be used for the field.
Column Data Type
The Column Data Type should be set to the datatype of the column within the database.
Implementation
This field determines the type of control that will be used to render the field on the generated browse form. Notice there are a few options available to prevent a field from being shown on the form. If a field is Locked you may want to either set this to be readonly (if you want the user to see the locked value) or you could set the implementation to Locked if you don't want the user to see it.
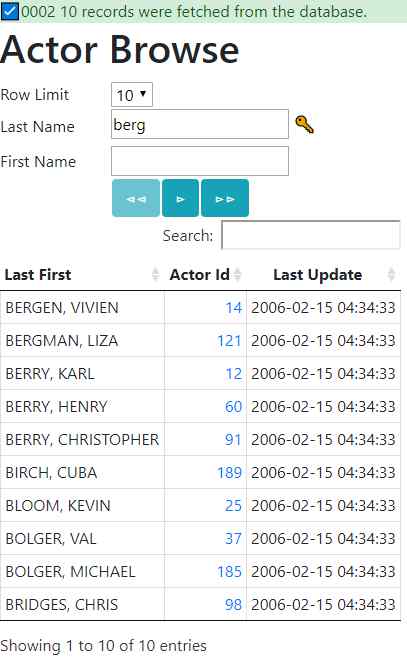
Dealing with Non-Unique Keys
One of the requirements of the db_table_browse model is that the combination of all keys must be unique. This is needed to support the extremely efficient method by which pagination is implemented. In our browse example the full combined key is City + Address. Since it would be chaotic to have the same address in two different locations within the same city we can be confident that this combination is unique.
Let's suppose that you want to make the key City + Postal Code. Since there could be many addresses within the same postal code this is clearly not a unique key. In such a case, you must introduce another field at the end of the list of keys to force the combination to be unique. The field that you choose may depend on whether you want to expose the field to your users. For example, you could add the address to the end of the key as shown here.

This would allow the user to position to a particular address within a given city and postal code. Whether or not this is a good idea depends on the data and on the application. Looking at the data rows in the screenshot (and assuming this is a representative sample) it would appear that it is very rare to have more than one or two addresses within a given postal code. Therefore, users would generally not require such precise positioning capabilities. Furthermore, if the address column is not defined as a key in the database, adding this as a key in your browse program could be unwise. In a case like this, a better choice of fields to make the key unique would be the address_id. Since this is the primary key of the of the address table it is certainly unique so adding this to the end of the browse key would, of course, ensure the overall key is unique.
The problem with adding the address_id to the end of the key is that this is not a field that users should be expected to know and it would just confuse them if we showed this as a key field on the screen as we did with the address itself. The db_table_browse model provides a method for dealing with this situation as we see here:

Notice that the Implementation column is set to Makes Key Unique. This setting should only be used on the last field of the key definition. When using this setting, the column will be used internally for browse positioning but it will not be exposed to the user as an input value.
UI Properties
UI Properties are entered in json format and can contain any valid HTML input property as well as pseudo properties starting with asterisk (*). For a complete list of properties refer to the drop-down in the Properties column when using the html_field model. Notice, in the example above, we are using an HTML Select control to input the country_id column. This makes sense since users are unlikely to know what country_id they want to browse but they will know the name of the county. The country selector was generated using the select model with allows the list of countries to be built dynamically by accessing the country table so that it is always up-to-date with the full list of countries. Nevertheless, since countries don't change very often, it is also possible to cache the country list select.
We have also set the required property for the country_id field so that the user must choose a country before conducting a search.
Next let's review some additional key and filter options appearing to the right of those shown above.

Locked Value
As mentioned above, it is possible to designate certain keys as being locked. This means that within a given search, only records exactly matching this value will be returned. There are a number of uses for this feature however a common use is to automatically filter search results according to that data the user is allowed to see. For example, a locked field might be a department id. This field could be initialised to the current user's department and hidden on the form. The locked value can include dollar functions. This is useful since it allows you to set the locked field value using a session variable, user property or query string value for example.
Null Handling
This setting is not needed on columns that are defined as NOT NULL. If nulls are allowed for a column, use this setting to indicate whether rows containing null values for the field should be included or excluded from the search results. From a sorting perspective, null values are treated as coming before blank values so, when sorting ascending, these will come first.
Group By
Check this option if search results are to be grouped by this field.
Alternate Parm
Often browse pages are used as helproutines whereby the caller can pass starting values or default filters via the browser query string. Sometimes the caller may not have the value needed to pass to the browse however, instead, they may have a derivative of the value. For example, suppose the browse is used to browse countries by name but the caller only knows the county code (not the name). In such a case, the browse can be written to accept the country_id as an Alternate Parameter. In this example, if the country is not passed to the browse but the country_id is passed, the id will be used to obtain the desired country name before the browse page is rendered.
Supported Wildcards
In most cases you will want to support all wildcard characters since this gives the user the maximum flexibility to express their query. Generally, if the database columns being searched can contain special characters such as *, :, =, !, etc. (that is the wildcard characters themselves) the user would not be able to search for values containing these characters. In cases such as this, you may want to disable wildcard support for the columns that commonly contain special characters.
Specifying Display Columns
The next step in setting up your browse program involves deciding which database columns you want to show in your output. It may save you some time by clicking the Default Display Columns button to initialize the columns according to what columns are available on the primary table. Then you can delete any columns that are not of interest.
Here we see the first few display column specifications:

Column Type
The Column Type column is used to define the behaviour and characteristics of the column. Let's review the various options:
Normal (DB to HTML)
Most of your columns will be indicated as type Normal (DB to HTML). This means that the column will be read from the database and rendered on the screen. Note that, by using formatters, the presentation/appearance of the field on the form does not have to exactly match they way it is stored in the database.
DB Only
Fields defined as DB Only will be read from the database but will not be rendered on the screen by default. These values can be used as part of the displays for other columns.
HTML Only
Use HTML Only for columns that do not reflect a specific database table column and use the Derived Column to specify the contents of the HTML. Suppose, for example, that you would like this column to contain an Actor's Last Name in bold followed by a comma followed by their first name. First you would need to define first_name and last_name as DB Only columns. This will ensure that those columns are fetched from the database.
The column to show the names would be defined as type "HTML Only" and the Derived Column text would be assigned the value <b>:actor.last_name:</b>, :actor.first_name:
Note that the fully-qualified database field names bracketed using colons (:) will be substituted for the database field value.
Detail Only Toggle and Detail Only
These columns work in tandem and are both dependent on the use of datatables (see Render As property). Consider the following browse output:

The first column is defined as type Detail Only Toggle. There can only be one such column defined. This is not a data column but rather the column contains toggle buttons that the user can click to request more information about the row. The extra information to be shown are the columns defined using the Detail Only type as we see here:

Notice that the Heading Text can be used to override the prompt that is used to show the detail values. Note that you can only use this feature to toggle values that are on the current table row (including joined values). Next we will look at another toggle feature that allows you to fetch new values as part of the toggle.
Ajax Toggle
Ajax Toggle is similar to Detail Toggle except it is possible to execute another query to load the toggled information. Let's suppose we want to show the list of all actors who have a role in the current film. This information must be fetched using a separate query. Notice above that we use the Formatter column to execute the url formatter to format the url that will be called via Ajax. The end result is that when the user clicks the toggle link an Ajax request will be made to the target URL and the results of the call will be shown to the user like so:

In this case, the browse_film_actors page is, itself, generated by the db_table_browse model however, in the query string parameters used to format the url we passed layout=none so that only the body of the page is returned to satisfy the Ajax query. Since all matching rows are returned, there are no selection fields and buttons shown as you would normally see in a browse page.
Another common use case is to use the system page named dbselect to return the results of a supplied query. The following example will return the first and last name of the actors associated with a supplied film_id.
url(page:dbselect,parameters:column=actor.first_name/actor.last_name&table=film_actor&key=film_id&value=:film_id:&join=left join actor on actor.actor_id = film_actor.actor_id&layout=none)
Note that the url function always generates encrypted urls. This is required because the dbselect page will not respond to unencrypted urls. This ensures that the component requesting the information can be trusted since normal users or hackers would not be able to formulate encrypted urls.
Custom Toggle
Custom toggles offer another method of showing additional details related to the current row. To use a custom toggle, you must write a JavaScript function that returns the data to be shown in the toggle area. The JavaScript function can be coded in the Local JavaScript section of the page definition, or it can be coded in an external script that is included in the page. Here we see a prototype for such a function.
function my_function(data,rowobj) {
  return 'This will be shown in the toggle area';
}
None
None can be used to temporarily disable a column that you may want to activate again later. This allows you to keep all of the other column information as part of the spec for later use.
DB Table Name
If the column is not part of the primary table, enter the column name to which it belongs.
Column Name
In most cases this will be the name of a database column. For Custom Toggle columns this is the name of the function to be called to return the information to be shown in the toggle.
Heading Text
Use this field to override the column heading text for the column. For Detail Only columns, this can be used to override the field prompt.
Hidden Option
Occasionally, you may want certain columns available for use within JavaScript but you don't want this column data shown to the user as a normal browse column. There are various ways that column data can be hidden as specified using the Hidden Option column. Here we see what each option does.
tr data tag
Column data will be presented in the HTML as a data attribute of the table row. For example:
<tr data-some_column="the value of some_column for this row">
hidden field
The value will be stored as a hidden field on the rendered form. The name of the field will be preceded by h_. For example:
<input type="hidden" name="h_some_field[]" value="some value" />
hidden td
This option is available when rendering using Data Tables. It makes the column part of the normal table data however css is used to make the column invisible.
hide on mobile
This is similar to the hidden td option except that the column is only hidden on mobile devices. This is a useful feature since it allows you to show additional columns on desktop devices (where there is sufficient screen real estate) while hiding these columns on small devices to prevent overflowing the small screen. Also see the Device column described below.
hide if helproutine
Often the same browse program is used as both a stand-alone browse/query program and as a helproutine used to populate one or more fields on a maintenance form. This option allows you to render fewer columns when the browse is used in "helproutine mode". This could be done to reduce the width of the popup helproutine so that it does not hide the underlying form or simply because a column may not be germane to record identification or selection.
show if helproutine
This is the opposite of the hide option above. Often helproutines are used to select primary key values to be returned to the opening form. Perhaps as a stand-alone browse the column corresponding to the primary key of the table row is someone meaningless or unimportant. Use this setting to hide the column when the browse is used in stand-alone mode.
Formatter
A formatter is a php class located in the classes/field_formatter folder (of the site or an inherited site like system). The formatter is passed the original database field and returns a value suitable for rendering on the screen. For example, you might store phone numbers as pure number in the database. Using a formatter these could be rendered as (999) 999-9999 or any other desired format.
Formatters can accept parameters. To do so, define set methods in the formatter class for each parameter that can be passed. To pass parameters to the formatter, include these in brackets after the formatter name using json to encode the parameters. For example, a simple formatter value to show the date portion of a timestamp field would be specified as:
date_only
If you wish to prevent dates from wrapping you could pass the nowrap parameter as in:
date_only(nowrap:true)
Here is another example that shows how several parameters are passed to the url formatter:
url(page:dblookup,parameters:column=address/city/postal_code&table=address&key=address_id&value=:address_id:)
Next, let's look at the remaining columns that can be used to control the display data.

Derived Column
Derived columns normally combine data from DB Only columns by mixing HTML with placeholders to represent database column data. Placeholders take the form :table_name.column_name:. See the HTML Only section above for an example.
Data Tables Definition
When rendering the page using the Data Tables framework, you can add additional definitions to the column. This must be coded using json format. For example, by default all columns are searchable by default but you can add searchable: false to a column if you do not want the search value to apply to the column. As many settings as necessary can be passed by separating these using a comma. For example:
className:dt-right,searchable:falseSee datatables.net for more examples.
SQL Function
SQL allows computed columns based on SQL functions. To render such a column enter the SQL function here. For example FORMAT(staff.salary, '#,#'). When using SQL functions, the Column Name in the grid should be used to supply an alias.
Device
It is possible to not render certain columns on mobile or desktop devices using this setting.