In most cases you will need a form handler linked to your form. One exception is when you are using a transaction to handle form validation and/or form completion processing. In such a case, you may not need any special form validation or handling logic.
In addition to validation logic, Form Handler Classes are used to implement business processes or logic to be associated with the form, that is, to respond to POST requests made when the user submits the form.
The field_list Collection
Form handlers often interact with fields (more specifically html_field objects) on the form. In addition to the fields directly on the form where the field handler has been linked, the handler can seamlessly access fields on nested forms (included using $page on the main form).
The field collection is defined in the variable $this->field_list. This is an array of field objects. The form hander calls methods of the field objects to get and set their value as well as access properties that control the appearance and behavior of the fields. Let's review the main methods supported by field objects.
Getting a Field's Value
The value method is used to obtain a field's value. In most cases you don't need to pass any parameters to the value method however two optional parameters are supported as shown here:
function value($format=NULL,$default=true)The format parameter can be used to return the value in a certain datatype. In most cases values will be returned as strings except for a checkbox values which are returned as boolean values. Numbers may also be returned as integers in some cases. By passing integer, float or boolean in parameter 2 you can automatically cast the returned value to the specified data type.
Parameter 3 is a boolean parameter that can be used to default a value if the field value has never been set or is currently set to null. Note that it is possible for fields to support null as a valid value by setting the *null property to true or to a value to be returned when the field has not been set.
In most cases the value method returns the contents of the value property. The one exception is for radio buttons. For radio buttons the value method returns that value that is currently assigned to the radio group (that is the radio button that is currently clicked). Let's look at a simple form:

Here we see a typical example of how the form handler could obtain the values from these form fields:
$name = $this->field_list['name']->value();
$gender = $this->field_list['gender'][0]->value();
$months = $this->field_list['subscription']->value('integer');
$payment_method = $this->field_list['payment_method']->value();
$paid_in_full = $this->field_list['paid_in_full']->value();
Note the following:
- We needed to index the gender field since this is a radio group. The value returned is the currently selected radio button regardless of whether we use index 0 or index 1 in this example. We provide more information about array fields later.
- We requested that the subscription value be cast to an integer so the $months variable will have datatype integer after the assignment.
- Since the payment_method select field is indicated with the multiple property set to true, this returns an array of values. When nothing is selected an empty array will be returned.
- Since the paid_in_full value is a checkbox, this value is returned as true or false depending on whether the field is checked.
Guarding Against Code Injection
By default, if a returned value contains a $function, the name of the function will be converted so that the HTML entity $ will be used in place of a $ symbol. This is done to prevent $functions from being injected by hackers into the forms in an attempt to execute code associated with the dollar functions if the field values happen to be rendered on the page. This can be disabled by adding the property *dollar-function:true to the field.
By default, if a returned value contains a <script> tag, the tag will be converted to <script> to prevent the script from being executed by the browser in case it is rendered on the page. This can be overridden using the property *allow-script:true.
The *dollar-function and *allow-script field properties should only be enabled in rare situations and never on public-facing websites. For example, GenHelm itself allows dollar functions to be entered in many of the model specifications.
Setting a Field's Value
To set the value of a form field we use the html_field object's assign method. This just takes one parameter which is the value to be assigned to the field. Here we see an example of assigning a field within the get method of a form_handler. This method is called before the form is shown for the first time.
Function get(){
	// Try to load the email address from a cookie and default it for the user
	$email = $this->site->dollar_function('cookie','email_address');
	if (!empty($email)) {
		$this->field_list['email']->assign($email);
	}
}
Similar to the get, you can set the current value of a radio button group by calling the assign method on any radio button instance within the group.
Certain data sanitization and formatting happens automatically during the assign operation. Also, formatting can be controlled by certain property settings. Let's review these features next.
Assigning Null Values
In order to assign a null value to a field you must set the *null property of the field. This can be set to true to support a null value or it can also be set to a string. In the latter case the string will be assigned to the field when the value passed to the assign method is null. To assign a null value for most types of fields pass a null value to the assign method. For select fields, pass a string value containing '(NULL)'.
Checkboxes
Values assigned to checkboxes will always be converted to true or false.
Numbers (including range Controls)
Some cleansing of number fields is handled automatically. If the step option associated with the number is an integer value the number assigned will be filtered as an integer. Otherwise, numbers will be filtered as float values. Note, they will not actually be converted to integer or float datatypes.
Zero values are normally trimmed to empty strings however you may add the property *zero:true to force zeros to be shown.
The *trim property can be set to l (lower case L) to trim leading zeros (to the left of the decimal) or r to trim trailing zeros (to the right of the decimal). Use trim value true or * form both left and right trimming.
Strings
For text values, the *trim property can be used to trim leading (l), trailing (r) or embedded (*) blank characters. For example, *trim:lr will trim both leading and trailing spaces.
The assign function also performs automatic case conversion when the *case property is associated with the field. *case can be set to upper, lower or mixed (for Title Case).
Special Considerations for null Values
GenHelm forms allow the user to select a null value. This is enabled by adding the *null:true property to the field. For most fields this will cause a separate partner checkbox to be added to the form which the user can select to specify a null value. For select fields, it is necessary to have an element in the selection options with a value of (NULL) (including the brackets). If you want to support null values, be sure to pass a false value in parameter 3 of the value method. Otherwise, null will automatically be converted to a blank or zero depending on the type of control.
Getting Property Values
Fields can have any number of properties assigned to them. Properties can by built-in HTML properties like size and placeholder or they can be extended properties such as *label and *trim.
Here we see the signature the the html_field object's get_property method.
function get_property($property,$format=NULL,$default=true,$default_value=null)In most cases you will just pass the property name that you want to retrieve. In the second example below we also show the defaulting feature:
// Check whether the apply_credit button is checked
$apply_credit = $this->field_list['apply_credit']->get_property('checked');

// Check whether a null email address can be supplied, default to false if not set
$supports_null = $this->field_list['email']->get_property('*null','boolean',true,false);
If defaulting is requested by passing true in parameter 3 but no default value is supplied in parameter 4, the default value will depend on the format supplied in parameter 2. For example, integers will be defaulted to 0, strings to empty strings, etc.
Setting Property Values
Property values can be set using the html_field object's set_property method. Here we show the parameters of this method.
function set_property($property_name,$property_value,$append=false)The optional append parameter is used to set properties that could have multiple values such as class and onclick. Set this parameter to true if you want to add the current property value to the existing value(s) rather than replace the current value(s).
Nesting Forms
Consider the following sample form:

Since this form contains several fieldsets, we can tell that it has been created by nesting several GenHelm forms (page components). Here is the definition for the main form.

Notice that each fieldset is implemented by using a nested $page function. We have used the cell property colspan="MAXCOLS" so that the nested forms span all of the columns of the form. In many cases, the need to explicitly code colspan can be eliminated by using colspan as the default behaviour for handling empty cells.
Our form handler class can interact with not only the fields such as invoice_number and load_invoice which are directly on this form but also with fields that appear on nested forms such as invoice_admin/status.
Here we see that one of the sub forms contains several buttons and links that start out in a disabled status (since they should only be clickable after an invoice has been loaded):

In our form handler (attached to the parent form) we can easily enable these buttons by setting their disabled property to false as in:
$this->field_list['cancel_invoice']->set_property('disabled',false);Array Form Fields
Most of the fields on your forms will likely be scalar fields and you won't need an index to access them. Nevertheless, there are a couple of situations in which your form fields will be defined as arrays.
Radio Buttons
Radio Buttons are always defined as array fields since each button instance has the same field name. You can determine the selected radio button by referring to the property *radio-value from any occurrence. For example:
$mstatus = $this->field_list['marital_status'][0]->get_property('*radio-value');Notice that we need to include an index after the field name to indicate the specific button (occurrence) to which we are referring. For radio buttons, getting the *radio-value property is the same as calling the value method. On the other hand, getting the value property returns the value that will be set to the radio group when the radio button is selected. Each radio button within a radio group must have a different value.
Multiple Form Fields with the Same Name
Whenever the same field is added to a form more than once, this always generates an array of field objects. Consider the following form snippet:

Since the merge field appears 3 times on the form, the merge field object will be configured as an array. This allows you to write code such as:
foreach ($this->field_list['merge'] as $index => $merge) {
	$order_number = $merge->value();
	...
}
Occasionally you may want to deal with a field as an array even though you may only need one occurrence in a particular situation. This can be done by setting the *repeats property as in:
:some_field,type:test,*repeats:true
This usually comes into play when dealing with things that can repeat any number of times, including 1. In such cases, your code is made simpler by treating the single case as an array.
Defining Functions in Form Handlers
Handler classes must support at least one method. Often this is the post method but this depends on how many different buttons can submit the form and other form requirements. There are no required methods, methods are generally called based on their existence. There are essentially two strategies for naming your methods:- Use the get_callbacks method to name your methods whatever you choose.
- Use the predefined method names (initialize, get, post and final plus names associated with submit buttons).
get_callbacks
If present, this will be the only predefined method that gets called automatically by the form. This method returns a series of callback methods that will, in turn, be called by the form. The get_callbacks method is primarily used on forms that include upload fields. This methods gives you granular control over what happens before and after the file upload processing occurs. This method should return a keyed array where the keys reflect the order in which the methods are to be called. Internally, uploads happen at sequence 5000, therefore, if you want to do something before the uploads, this should have a sequence number less than 5000 and methods that execute after the uploads should have sequences higher than 5000. In most cases, you will want to utilize the value of the variable $this->ispostback since the methods to be called during get processing will likely differ from those during a postback. You might also want to use the variable $this->button_pressed if your form has several submit buttons. It is also possible to have an array of identically named submit buttons, in such a case you will want to check the variable $this->button_index to determine which button was pressed.
Upload Example
It should be noted that in most cases upload processing can be handled automatically by setting the appropriate properties on the upload fields. The main consideration is in determining what names to be assigned to the uploaded files. By default, the file name used will be the same as the name of the file uploaded by the user. Nevertheless, this could cause collisions on your server if two users happen to use the same file name. An alternate strategy might involve using a name that is based on the date and time that the file was uploaded. In this case you could set the property *upload-filename to something like $time(,,timestamp,ttt).
In another example, let's assume that the user will be uploading several images of different sizes. The user will supply the base file name that will be used as a prefix for all of the files being uploaded. The suffix will be set according to the size (small, medium, large, etc.) as well as the type of file that was uploaded. Since this requires very specific handling we need to write some custom code to integrate with the default upload handling.
We start by creating the following html_field_type definition called image_upload.
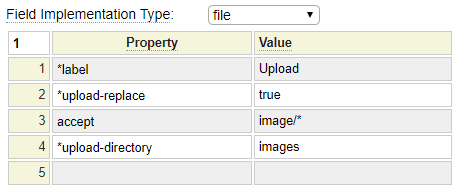
Notice that this field type:
- Supplies a default label for fields using this type.
- Indicates that uploaded files can be replaced if the name to be used already exists on the server.
- Tells the browser to accept only images with mine types starting with image/.
- Specifies that the uploaded images should be saved in the site's images folder.
By default, images are under the public_html folder. Most of the other folders default to being private however you can override this by setting the *upload-public property to true. Note that, since images is a public facing folder, you would normally only allow authorized users to use this function. If the page did not require a login for example, any internet user would be allowed to upload images into your site's image folder.
Now let's assume the following form definitions contains our upload fields:
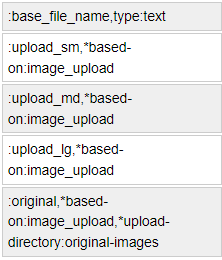
Make note of the following:
- The form contains a text field called base_file_name, this is where the user will enter the prefix portion of the filename that will be used to save the uploaded files.
- The form contains four upload fields that are based on our image_upload definition.
- The first three uploaded files will be saved within the images folder and the name will be generated by combining the base_field_name with a suffix that depends on the form field name.
- The last upload files will be saved within a folder called original-images and for this file we will keep the name the same as the file that the user uploaded.
For this example, we actually don't need to use the get_callbacks method since we could simply place our code in the post method however, let's assume there is other processing we want to perform.
Consider the following method definition:
function get_callbacks() {
	if ($this->ispostback) {
		return array(4000=>'configure_upload_files',6000=>'after_uploads',7000=>'configure_buttons');  }
	else {
		return array(7000=>'configure_buttons');
	}
}
Since the get_callbacks method is coded, other standard methods such as initialize, get and post will not be called. Instead, the form calls the get_callback method and it returns an array of method names that are to be called. In the example above, if this is not a postback only the configure_buttons method will be called. If this is a postback, the form will call the following methods in sequence:
- configure_upload_files
- [file uploads will take place here since this happens at sequence 5000]
- after_uploads
- configure_buttons
If any method returns false, processing will be stopped and subsequent methods will not be called.
Let's look at a sample method called configure_upload_files. This is used to perform the file renaming described above:
function configure_upload_files() {
  $convert = array('jpeg'=>'jpg','x-icon'=>'ico','x-png'=>'png','svg+xml'=>'svg');
  $base_file_name = $this->field_list['base_file_name']->value();
  foreach ($this->upload_fields as $field_name => $field_obj) {
    $error_code = $field_obj->get_property('*upload-error','integer');
    if ($error_code === 4) {
      continue; // File is not set
    }
    $type = $field_obj->get_property('*upload-file-type');
    if (substr($type,0,6) !== 'image/') {
      return false; // Only images can be uploaded
    }
    $type = strtolower(substr($type,6));
    if (isset($convert[$type])) {
      $type = $convert[$type];
    }
    $upload_field_name = $field_obj->get_property('name');
    if ($upload_field_name === 'original') {
      $file_name = $field_obj->get_property('*upload-original-name');
    }
    else {
      $suffix = substr($upload_field_name,7); // Strip upload_ off the front
      $file_name = $base_file_name.'-'.$suffix.'.'.$type;
    }
    $field_obj->set_property('*upload-filename',$file_name);
  }
  return true;  // Continue with the uploads
}
The main objectives of this sample code are as follows:
- The code assumes that the web user has provided a name to be used to derive three of the uploaded file names so we store the posted field value in the variable $base_file_name.
- Loop through the upload field collection to process fields for which the user has selected an upload file.
- Make sure only mime types associated with images have been selected. Although we have specified this in our accept property, hackers could circumvent our form to try to inject code to our server so it is a good idea to confirm that malicious types cannot be uploaded, especially to a public directory.
- Determine the name to be given to the uploaded file (this should be assigned to the property *upload-filename).
- Return true to tell the form to proceed with the uploads.
Next we will consider the methods that can be coded in instances where you do not require the complexity of using your own callback methods. These methods will be called automatically if they exist (provided no get_callbacks method has been coded).
initialize
We will learn later that two of the main form handler methods are get and post. These methods are called on the initial http GET request and on subsequent POST requests, respectively. Sometimes you want to perform processing irrespective of whether you are responding to get or post. In such cases, place the code within the initialize method since this method (if present) will be called as the first method for all requests.
Let's suppose your form is intended to show information about employees within a certain branch. Assume that the branch_id is a required numeric parameter. Suppose the form also allows an optional string parameter called format that can be used to change the format of the output. Our initialize method could include the following code to obtain and preserve these parameters:
function initialize() {
  $this->branch_id = $this->form->parameters->get_required_parameter('branch_id');
  $this->format = $this->form->parameters->get_or_default('format','wide');
  // Preserve these parameters on the form
  $this->form->parameters->keep_these(array('branch_id','format'));
}
Since branch_id is required, we are using the parameters method get_required_parameter. This will raise an error if the branch_id parameter is not passed. Since the format parameter is optional we use the method get_or_default and we pass a default value in case it is not supplied. Finally we call the keep_these method so that these parameters are carried across to all subsequent post requests. This preserves the parameters without requiring session variables regardless of how many times the form is submitted. These fields are not coded explicitly in the form, this happens automatically by calling the keep_these method.
get
The get method (if present) is called when the form is loaded for the first time. This would be called after the initialize method (if present). This method might be used to set a one-time message to welcome the user to the form.
get_formname
Sometimes, the same form handler class may be used for several different forms. For example, when there are several forms involved in a transaction you may decide to reuse the same handler class for several of the forms. In such a case, you can code get methods that are specific to each form by naming the method get_ followed by the form name. If such a method is defined, this method will be called instead of the get method. Note, if the form name contains dashes, the method must use underscores in place of the dashes. If the form is defined within a folder, only the last part of the name is used (not the path portion).
button_name
If a method exists with the same name as the button that was pressed to submit the form, this method will be called. For example, if the form contains a submit button or image named search, when this button is pressed the form looks for a method called search. If such a method is defined, this method will be called instead of the post method.
When naming your buttons, avoid using the same name as the form handler class itself since this method name is reserved for the constructor method of the class (which will eventually be deprecated in favor of using the __construct method).
post
If your form only has one submit button or if much of the post processing is common to all submit buttons then it may be easier to just code a post method with logic to handle any differences rather than having separate methods for each buttton.
If present, this method is called for each postback request (provided there is not a button-specific method). If the form has several submit buttons, the post method should use the class property $this->button_pressed to determine which action to perform.
Both the post method and the button-specific methods are called before uploads take place so these methods can configure the upload fields if necessary. Be sure to return true if processing is to continue or false to stop further processing such as file uploads.
post_formname
Sometimes, the same form handler class may be used for several different forms. For example, when there are several forms involved in a transaction you may decide to share the same handler class for several of the forms. In such a case, you can code post methods that are specific to each form by naming the method post_ followed by the form name. If such a method is defined, this method will be called instead of the post method. Note, if the form name contains dashes, the method must use underscores in place of the dashes.
Form Placeholders
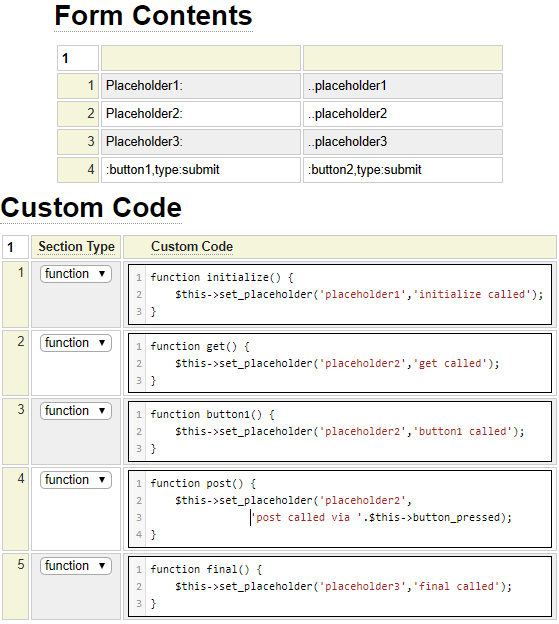
Consider the following form definition.
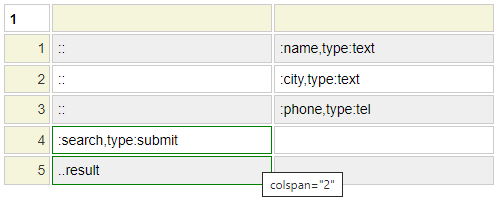
One thing to make note of is that two of the cells have a green border. This indicates that these cells have cell properties defined. You can hover over the fields to see the contents of these properties. Place you curser in a cell and type <ctrl>+ENTER to set or update these properties.
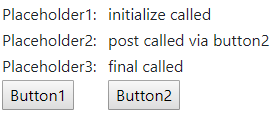
Notice that the cell on the last row contains the value ..result. Since this cell begins with two periods (..) this signifies that this is a placeholder cell. Such cells can be assigned by a form_handler class by calling the method set_placeholder as shown in the example below.
Typical post Method Pattern
A common use of the post method is to serve as the "glue" between the form and a service object. Since the form_handler is tightly coupled to a form you should generally avoid performing a lot of complex business logic directly within the post method. Instead, this logic should be encapsulated within a reusable class that can be called from the form handler and perhaps from other places within your application. Let's look at what a typical post method might look like assuming it is used by the form shown above:
function post() {
	require_once SITE_CLASS_PATH.'get_history.php';
	$history = new get_history();
	$history->set_site($this->site);
	$history->set_name($this->field_list['name']->value());
	$history->set_city($this->field_list['city']->value());
	$history->set_telephone($this->field_list['phone']->value());
	$history->set_return_format('html_table');
	$return = $history->search();
	if ($return === false) {
		$result = $history->obtain_message();
	}
	else {
		$result = $return;
	}
	$this->set_placeholder('result',$result);
}
Notice that the post method simply sets up another object which will perform all of the heavy lifting. The post object has access to all of the form field objects and it can obtain the current value of any field by calling the value method of the field object. If necessary, we can also update the form field values by calling a field object's assign method.
Notice at the end of the code we call the set_placeholder method to copy the content returned from the get_history class to the placeholder cell on the form.
Setting Placeholders in Nested Forms
We have seen how the set_placeholder method can be used to update a cell on a form that is linked to form handler. This method can only be used to assign placeholders that are directly on the form that references the form handler. If the placeholder is defined on a nested form you must use the alternate method set_subform_placeholder. The first parameter to this method is the name of the form containing the placeholder. The remaining parameters are the same as the set_placeholder method. Here we see an example that shows how a placeholder is set within a nested form.
$link = array('pageid' => 'invoice_admin/correct_email_address',
			'querystring' => 'invoice_number='.$invoice_number.'&incorrect_email='.$email,
			'target' => '_blank',
			'encrypt' => 'encrypt');
$email_correction_link = $this->site->dollar_function('link',$link);
$this->set_subform_placeholder('invoice_admin/status','email_correction_link',$email_correction_link);
Setting Messages
Any method can set a message on the screen by calling the assign_message method of the form. Usually you will want to define your error messages using the messages model and use these numbers to lookup messages. Here is an example showing how messages are assigned.
$this->form->assign_message('!general',0001,'Name',':1: is required.',__LINE__.' '.__CLASS__);assign_message Parameters
- The first parameter to assign_message indicates where to find the message. Messages are defined using the messages model and this is the name of the spec under which the desired message was stowed. The above code references general messages residing in system. We can tell this because general is preceded by an !. The exclamation mark would not be used to reference messages that reside within the current site.
- The second parameter is the message number to be looked up and shown. In this case, the message must reside within the general messages defined in system.
- The third parameter is used to substitute values into placeholders (:1:, :2:, etc.) defined within the message. If there are no placeholders, pass false in this position. If there is more than one parameter pass an array with one entry for each placeholder. For example, if there are three placeholders in the message, this parameter might be array('Birthday',$date,'future').
- The fourth parameter should show the contents of the message. This parameter will generally not be used for anything but it makes the code more readable to show the message text here. This parameter will be used as a fallback message if the referenced message is not defined.
- The final parameter provides an indication of where the message is set. This is used for debugging and reference purposes.
Here we see that if the user hovers over a message they are shown the name of the class and line number where the message was set; this comes from parameter 5.

When messages are assigned at the form level they will be positioned at the top of the form (or wherever the message area object is located in the current codeframe),
It is also possible to position messages next to the field in error, this is done by calling the assign_message method of the field object whose value is in err as shown here:
$this->field_list['name']->assign_message('!general',0001,'Name',':1: is required.',__LINE__.' '.__CLASS__);External messages (using message numbers) are preferred because this allows you to share messages and also facilitates the translation of messages into other languages. If you do not wish to use external messages, you can also set message text directly using this method:
$this->form->assign_message_text('danger','some message text',__LINE__.' '.__CLASS__);Where the first parameter is the severity (one of danger, warning, info or success) and the next parameter is the message text.
Note that messages appear on the screen by default, you can configure your site or a particular form to have messages pop up. To learn more, visit this page which describes various config settings.
The final Method
If present, the final method is called after a post method or after any button-specific methods. The final method is called after the file uploads are processed so this method can handle any post upload logic.
Passing Parameters from the Form
Sometimes you may want to use the same form handler class from several different forms. This is certainly possible since the form handler is not directly coupled to any given form. Nevertheless, there may be times when the form handler needs to have some context related to the form it is handling. This can be provided using the Form Handler Parms parameter (located in the form specification). Suppose your website has several order forms for custom tarps and all of these order forms use the same handler class named custom_tarp_validator. Further suppose that there is a specialized order form for round vinyl tarps. This form might pass the following parameters to the handler class.

You may have another specialized form for ordering square canvas tarps. This would pass the parameters as shape:square,material:canvas.
The form handler can call the form method get_form_handler_class_parms to obtain these parameters. For example:
$form_parms = $this->form->get_form_handler_class_parms();
if ($form_parms['shape'] === 'round') {
  // round tarp handling
}
Another way that you might be able to determine the context in which a page is running is to check either the page name itself by calling $this->site->get_current_pageid() or by using the transaction name if the same pages are involved in different transactions. Here we show an example of this.
$trans = $this->form->get_transaction_name();
if ($trans === 'round_tarp') {
    $tarp->set_shape('round');
}
else {
    $tarp->set_shape('rectangle');
}
Other Optional Methods
Form handlers can define the following optional methods as required. These methods will be called automatically if defined.
pre_initialize
This method can be used to assign session variables that are used on the form or within field definitions (via $session functions).
adjust_form_action
On rare occasions you might want to adjust for action string that is used during a form postback. In such a case, you can add an adjust_form_action method to your form hander. This method accepts the default action (url) as a parameter and returns a new action string to be used.
extra_form_properties
Occasionally, you may want to add extra properties to the generated form tag. The extra_form_properties accepts one parameter, which will be set to true if the request is a postback and false otherwise. Return a string containing any extra parameters to be added to the form tag as shown here:
// Don't perform spellcheck on this form
function extra_form_properties($postback) {
	return 'spellcheck="false"';
}
This function can only be used in form_handlers attached to the root form. It will not be called when attached to nested forms.
Form Context
One of the features of forms, and web pages is general, is that they can be repurposed as reports and emails. When your form is linked to a transaction, the transaction can save the contents of posted forms to report files. Furthermore, if the transaction links to a mailform, this can email the contents of the form to you, the site owner, or your customer (who submitted the form). Sometimes it is important to know the context in which your form_handler's methods are being called. This can be obtained by calling the site's get_context method. The context value is generally set to one of the following values:
| browser | A normal web page request. |
| report | The page was loaded as a report file of a transaction. |
| The page was loaded to build the contents of an email referenced on a mailform linked to a transaction. |
In the example below we generate an error if the user has not entered enough characters in the comments field. This will only be done in the context of a browser request.
function post() {
  if ($this->site->get_context() !== 'browser') {
  	return true; // Bypass checks
  }
  $comments = $this->field_list['comments']->value();
  if (strlen($comments) < 35) {
    $this->field_list['comments']->assign_message('validation',1004,false,
    	'Please provide a more detailed description to help us respond to your query. ',__LINE__.' '.__CLASS__);
    return false;
  }
}
Alternatively, you can check the context within the get_callbacks method in order to adjusts the callback methods based on the context as shown below.
function get_callbacks() {
  if ($this->ispostback and $this->site->get_context() === 'browser') {
    return array(6000=>'post');
  }
  else {
    return null;
  }
}
function post() {
  $comments = $this->field_list['comments']->value();
  if (strlen($comments) < 35) {
    $this->field_list['comments']->assign_message('validation',1004,false,
    	'Please provide a more detailed description to help us respond to your query. ',__LINE__.' '.__CLASS__);
    return false;
  }
}
Automatic Querystring Handling
It should be noted that a built-in feature of forms is that most form field values can be supplied via the query string automatically. For example, let's say you have a form (page) named x that contains fields named y and z. If this form page is requested using a url such as https://www.someurl.com/x?y=y-value&z=z-value the form will be shown with y-value in field y and z-value in field z. Although this is the default behaviour, you can disable this for certain fields by using the field property *qsinit:false.
One thing that you might want your get method to do is to automatically post back the form in cases where values are supplied via the querystring. Let's look at an example of how this could be done:
function get() {
  $fields = array_keys($this->field_list); // Get all the field names on the current form
  // If a value was passed for one of our form fields automatically submit the search button.
  if ($this->form->parameters->is_set($fields,false)) {
    $script = 'document.inputForm.search.click();';
    $this->form->add_script('search',array('javascript'=>$script,'placement' => 'bottom'));
  }
}
Notice that this code uses the field_list collection which is available to the form handler class. This collection contains instances of all of the fields on the current form. Since this is keyed by the field name we can use the array_keys function to gather all the field names on the current form. We can pass this list of names to the is_set method of the form parameters object to ask if any of these fields have been set. By default, the is_set method will accept empty (blank and zero) querystring values so we pass false since we only want to consider non-empty values.
Next, if the form was passed one of the field values it adds some script to the current form to programmatically click the form's search button to trigger a postback without requiring user interaction.
Local Validation
In the context of this section we define Single Field validation as validation that only requires the value of one form field. For example, the height value must be greater than 10 and less than 90. Multi-Field validation is validation that requires two or more field values. For example, height X width must be less than 300.
Single Field Validation
If you wish to incorporate local (JavaScript) validation that involves a single form fields, your best option is to add the pseudo property *local-validation to the fields (or their field_type definition). This property must be assigned the name of a function to be called to validate the field value. The called function should return a message if the field's content is invalid. In such a case, the message will be automatically rendered in an alert and the form will not be submitted. The called function must take an instance of the form field as a parameter. This can be used to get the value of the field. This function can be defined within the Local Javascript of the form or within an external script file referenced by the form. There are also several *script-* pseudo properties that can be assigned to the field itself to pull in dependent script files.
Multi-Field Validation
Form handlers are capable of adding JavaScript to the generated form for the purpose of performing local validation. This is the recommended method for local validation that involves several form fields. This is done by adding one or more entries to the array named:
$this->site->global_info['name-of-form']['client-validations']
Consider the following function that could be included in a form handler:

Rather than hardcoding the form name, the code gets this from the form object. This makes the code more versatile in case the name of the form ever changes. The function defines JavaScript code that will be placed within the local validation that is executed when the form is submitted. The code checks to make sure that either the phone field or the email field is filled in. If neither is entered, it pops up an alert and returns false to prevent the form from being submitted.
Here we see this code embedded within the context of the rendered HTML form page. Notice that other code is automatically generated to prevent the form from being submitted twice if the user double-clicks the submit button.

Demo Form Hander
If you are just learning about form handlers it is a good idea to try a supplied form handler named demo. To use this your form will need a placeholder field called ..result. Usually, this should span all columns as shown here:

Here we see that the demo form_handler shows you useful variables and field properties that you can make use of when you write your own form handler:

Supported Examples
The example command can be used to load the following examples:
example cart
Build example functions for cart item form_handler classes.
Using Traits
Including the trait Definition
Traits defined using the php_trait model are generated into the trait subfolder of the main classes folder. Therefore, to incorporate traits defined within system you first have to require the trait using:
require_once CLASS_PATH.'trait/tname.php';
If the trait is defined within the current site, it should be included using:
require_once SITE_CLASS_PATH.'trait/tname.php';
In each case, tname is the name of the trait to be used.
The reference should be defined within the Before Class definition as shown.

Adding the use Statement
Within the Custom Code section, set the Section Type to be use and set the Location to be After Last Sibling. Enter the full use statement within the Custom Code column as shown:

Sorting Properties and Functions
You can sort both properties and functions (methods) by using the sort command. To only sort properties you can enter the command sort properties. To only sort functions, enter the command sort functions.