The googlemap model allows you to render maps using the Google Maps JavaScript API. The maps you define can include any number of map markers to show points of interest to your web users, such as your office locations.
Google Map API Key
Before creating your first Google Map, it may be necessary to obtain an API key. These keys are required by Google and must be linked to a billing account since Google charges a fee for using their map API. Google provides a monthly credit so that low volume users generally do not have to pay to use their API. If you have not obtained a key, follow this link to register for a key.
Normally you will use the site_settings model to define the Google Map API key as a config setting as shown here:

In such a case, this key will be used for all of the pages within the site. If necessary, you can use the config settings at the page level to override the key for a specific page.
If there is no key specified for the page or site, the system will attempt to use the key defined in the server config file (located in the folder private_data/system/config). To use a common key for several sites on a server, define the key in this config file using a set statement such as the following:
$this->set_config('google','map_api_key','BlzaDAFSnspccKfS6KifSxA9yIW3aTGuD20GfI');Sizing Your Map
Embedded maps are designed to be responsive. Therefore, rather than specifying an absolute size for the map, the size is expressed as a ratio of the width to the height. The actual size of the map will depend on the size of the container in which the map is located. Often the container size will depend on the size of the current browser window. This allows the same map to be used on large and small devices. In the following example we are indicating that the map should be 1.5 times as wide as it is tall.

Notice that it is also possible to limit the size of the map to a certain maximum width and/or height.
Setting the Zoom Level
The map zoom level determines the geographical area to be shown on the map. Maps can be zoomed in so that only a small area is shown, such as a city block and they can be zoomed out so that the entire world is shown on one map. The zoom level can be set differently for phones and other mobile devices as opposed to desktop devices. If you would like the zoom level to be set such that all defined markers are shown, you can use the Auto Zoom feature. This will set the zoom level as tight as possible while still showing all defined markers.
Setting the View
Google maps supports four different views. You can set the initial view to one of Roadmap, Satellite, Hybrid or Terrain. Additionally, you can add up to two buttons to allow the user to choose an alternate view.
Centering the Map
If you know that you want to center the map on a specific lat/long coordinate, enter the coordinates in the fields provided. If you are unsure of the lat/long values, you can instead enter the address of the center point and then click on the button labelled Lookup Lat/Longs.
If you want the map to be centered across all markers, you can click on the Calculate Center Lat/Long button. This will analyse all of the marker positions and calculate the center point. Alternatively you can perform this calculation at runtime by leaving the Center Latitude and Center Longitude values empty.
Open Marker
It is possible to open a popup to show extended information for each marker by clicking on the marker. If you want a particular marker to be shown by default when the map is first loaded, enter the ID of the marker in the Open Marker field. The ID corresponds to column 1 of the marker grid.
Include JQuery UI CSS
The popup display which shows extended information associated with the markers can be formatted using JQuery. To do so, select the JQuery theme you would like to use. This link will open a page that shows each of the jquery UI examples.
Default Simple Infobox Class
A simple infobox will be used to display extended information if there is only one tab of content. Use this field to specify the CSS class to be used to style the infobox. This class must be defined locally or within an external stylesheet.
Default Tabbed Infobox Class
The CSS class entered here will be used to style popups for markers that define multiple tabs of information. This class must be defined locally or within an external stylesheet.
Default Overlay Class
Maps allow textual information to be overlaid on top of the map. Enter the CSS class to be used to style these overlays. This class can be overridden for individual markers.
Marker Pan Control
Maps include a control to allow the user to pan the map. Choose the location on the map where you would like this control to be rendered.
Dynamic Content PHP Class
Sometimes the markers to be loaded are not known at the time you create your map. Suppose you are building a store finder whereby the stores to be shown on the map correspond to those that are nearest to your web visitor. In such a case, you may have to ask the visitor her location and use this to query a database to identify the stores that are nearest to that address. In order to do this you must write a PHP class that defines a pre_generate method which will be called to dynamically load markers.
In most cases this class will be defined as a subclass of \system\dynamic_googlemap_base. The class you write will normally define a series of markers by calling the define_point method as shown here:
// Define lat/long of the marker.
$this->define_point('toronto_marker',
43.6694507,-79.3882622);
Note that the first parameter is a marker id and this must be unique across all markers to be added.
Having added a marker, you can optionally add a 1-character label to the marker using this method:
$this->set_label('toronto_marker','T');You can add a tooltip to the marker using this method:
$this->set_tooltip('toronto_marker',
'Toronto City Hall');
For other methods, try creating a static marker with the features you need and then review the code that is generated by the googlemap model and emulate this code within your class.
After Load Function
If you want some JavaScript code to be executed when the map first loads, code your JavaScript either locally or within an external JS file and enter the name of the function to be called when the map is being loaded.
Default Icon
If you have defined an icon using the googlemap_icon model, you can specify this icon to be used as the default icon. Individual markers can also specify an alternate icon to be used.
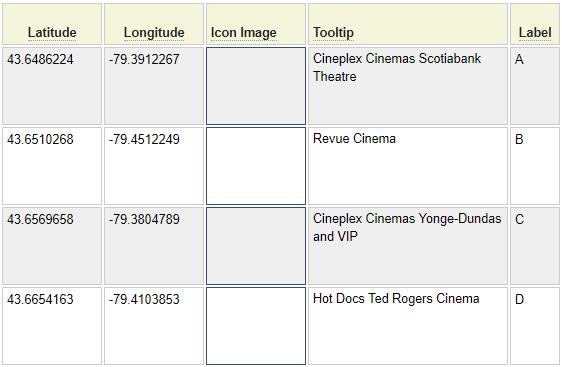
Defining Markers
The main grid of the googlemap specification is used to define the markers you want to be added to the map. In this section we describe the various columns of information that can be associated with a marker.
Marker Id
Every marker must be assigned a unique identifier. Be sure to set this identifier before stowing your specification since markers without identifiers will be dropped during the stow process.
Address
The address is not used when rendering the map however you will generally enter street addresses for all of your markers. This will allow you to use the Lookup Lat/Longs button to automatically fetch the lat/long values for all rows that contain a Marker Id and an Address but do not already have a Latitude and Longitude indicated.
Latitude and Longitude
If you know the Latitude and Longitude of the marker to be added enter these here. Otherwise, enter the address and use the Lookup Lat/Longs button to look up the Latitude and Longitude.
Icon Image
If this field is left empty, the default red pushpin icon will be used unless there is a default icon specified in the Default Icon field above. Occasionally, you may not want any icon to be shown, for example if you are only using the row to define an overlay. In this case, enter ! in this column to indicate that no icon is to be shown. If you want a specific icon for this marker enter the name of the googlemap_icon object to be used as the icon. You can double-click on this field to select from a list of available icons. Follow this link to learn about generating Google Map Icon Definitions.
Tooltip
You may use this column to enter text that will be shown when the user hovers over the corresponding marker.
Label
You may enter a one-character label to be shown on top of the marker icon.
Overlay Information
The next four columns are used to overlay text onto the map. Overlay can be added in addition to markers or instead of markers by enter a ! in the icon field.
Use the Overlay Content column to enter the information to be shown in the overlay. This can include HTML tags. By default, the gmap_overlay CSS class will be used to style the overlay however you can override this by entering an alternate class in the Overlay Class column.
Shifting Overlays
If you are using the row to specify an overly only (by entering ! in the marker icon) there is usually no need to shift the overlay since you can just specify the exact lat/long position corresponding to where you want the overlay to be shown. If you are combining markers and overlays on the same row, you might want to shift the overlay so that it does not overlap with the marker icon. Use positive numbers to shift the overlay the specified number of pixels to the right and/or below the marker. Use negative numbers to shift the overlay to the left or above the icon.
Defining Tabs
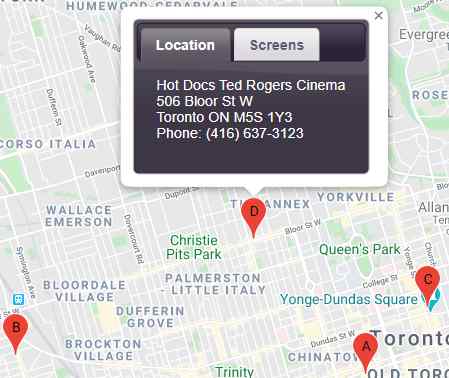
Each marker can define any number of tabs of information. Use the insert column feature of the flexgrid control to add new tabs. The tab name is entered in row 1 of the grid. Here we see an example of two tabs used to show information about movie theatres:

Notice that the tab content can include HTML tags.
Here we show what the user will see when they hover over or click on the icon associated with the second theatre.

Note that the styling of the tabs is controlled by selecting the desired JQuery UI Theme,
Map Configuration Options
Google Maps supports many configuration options. This grid can be used to set any desired configurations. In most cases you will define the configuration setting in the Common Setting column so that it applies to all devices. If the desired setting differs for desktop and phone devices, use column 3 and 4 to set these independently.