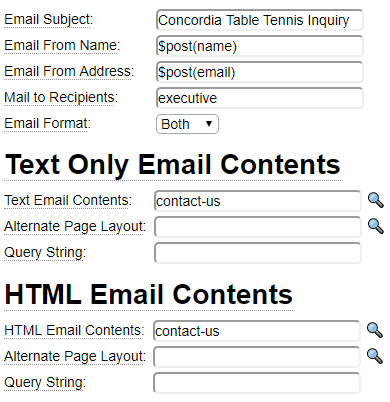
The mailform model is used to send web forms via email. When a web visitor fills out a form you often want to send the form details to certain company representatives. This is done using mailforms. You can also define a webform to send an email to a customer or prospect.
Before creating a mailform definition refer to the help for email recipients.
Repurposing Web Forms as Email Content
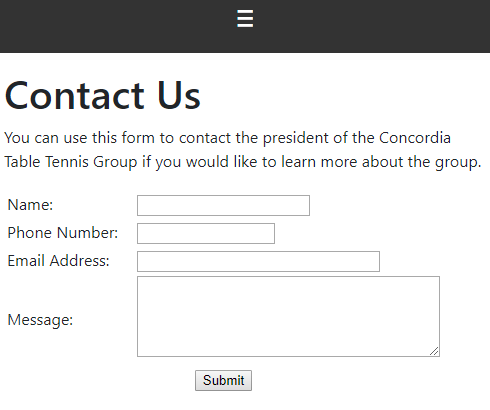
One of the powerful features of forms and layouts is that they allow content to be reformatted and re-purposed. Consider the following web form used on a contact page:
Let's learn how we can send the same content entered on the form to a site owner using a mailform definition.
Changing Form Fields into Text
One of the built-in features of all forms is that you can ask for the form in "report mode". In this mode all HTML controls are replaced by the value property of the control. In this mode certain controls, such as buttons, are not shown at all. There are a couple of ways that you can change a form into report mode:
Using Config Settings

In this case we have set the config at the layout level so whenever the form is rendered using this layout the report mode option will be set.
Adding report=true to the Querystring
A second method for activating report mode is to add the report setting to the querystring.
Email Layouts
When emailing form content you generally want to use a specialized layout so that content such as menus, banners and footers don't appear in the email content. Special layouts are supplied and used for this purpose. These layouts set the report option to true and limit the content to just the form information.
Removing Preamble and Postamble Content
Recall that all pages can define preamble and postamble text to go before and after the main page content. Often you do not want this extra information to be shown in the sent email content. This can be achieved by adding skip_preamble=true and/or skip_postamble=true to the querystring. Both of these options (as well as the optional wrapper tag) can be removed by adding skip_embellishments=true to the query string.
Let's look at the contents of the page shown earlier when we use the querystring to override the layout and skip the preamble and postamble.
https://www.someurl.ca/contact-us?layout=email_to_site_owner&skip_embellishments=true
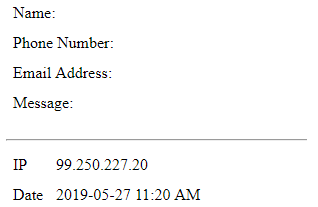
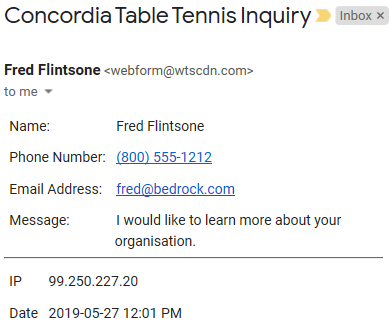
Notice the HTML controls are not shown (we don't actually see the values because we are showing the form using a GET request rather than a POST request so the form fields do not have values). Also notice that some addition information about the web user has been provided by the email_to_site_owner layout.
It should be noted that we did not have to enter any values to override the layout or querystring in the mailform parameters. This is because the default layout for text only emails is text_only_email and the default layout for html emails is email_to_site_owner. Also, skip_embellishments=true is set by default, if you want to include the preamble or postamble text in the email you can supply a querystring value to allow this. For example, show_preamble=true.
Assembling Information from Multiple Forms
Although the most common use case of mailforms is to use the form that was submitted as the basis for the email content, this does not have to be the case. You may have a situation where several forms are used to collect the user input and you want to assemble all of this information in your email. In such a case you can just create a new form for the purpose of emailing the submitted content. This form can gather all of the fields and/or subforms that you want to send.
If the format of the existing forms is suitable you can even create a "super form" by simply aggregating the individual forms by using $page functions which reference the individual forms that you want to aggregate.
Configuring Mailform Email Addresses
When emails are sent, there are two important email addresses in the header of the email. One is the sender email, the address of the sender must coincide with the primary domain (mail server) under which the email was sent. Otherwise, your emails are likely going to bounce back or land in the spam folder of the recipient. For this reason, the sender email address is set in the config file of the server.
The second important email address is the reply-to. In most cases, this email address is associated with the (add-on) domain from which the email was initiated. The reply-to name and address are assigned using these mailform parameters:

These values can include dollar functions if you wish to set the values from post or session variables.
Automatically Generating Field Labels
Some of the forms that you may want to send as emails might not have separate label text because field placeholders are serving as labels. We see an example of such a form below:

By default, if this same form is used to send the posted values as an email, the resulting email will not have any field context. It would simply contain a separate row for each value entered by the submitter. There are two methods to overcome this issue:
- Create a separate form that has labels, and reference this form within the mailform specification.
- Reference the original form in the mailform specification but pass an autolabel parameter.
Here we show an example of the second case:

When autolabel is enabled, labels will be added in front of the field values as we illustrate in this sample email:

Here is a snippet of the generated HTML content that is included in the email:
<table style="width:100%" id="contact-form">
 <tr>
  <td class="form_field"><label class="email_label" id="label_text_name">Name: </label>Fred Flinstone</td>
 </tr>
 <tr>
  <td class="form_field"><label class="email_label" id="label_email_email">Email: </label>fred@bedrock.com</td>
 </tr>
 <tr>
  <td class="form_field"><label class="email_label" id="label_tel_phone">Phone: </label>12312312121</td>
 </tr>
 <tr>
  <td class="form_field"><label class="email_label" id="label_textarea_comments">Comments: </label>
    A rock fell on me at work and I got badly injured.</td>
 </tr>
</table>
Here are the rules that determine how the automatic labels will be created.
- If a field includes the property *autolabel:false, no label will be created for this field.
- Otherwise, if the field includes a *label property, this will be used as the label value.
- Otherwise, if the field includes a placeholder property, this will be used as the label value.
- Otherwise, no label will be created for the field.
Related Label Properties
*label-suffix
When using the autolabel feature, the default behaviour is to add ": " after each label reference. You can override this value by using the *label-suffix property. For example, if you want the Comments label shown above to appear on its own line you could add the parameter *label-suffix:
.
*label-skip-empty
If your form contains a lot of optional fields, you may not want to show the labels for fields that have not been filled in by the user. This can be achieved by adding the *label-skip-empty property to all labels that are not be be shown unless the corresponding field has a value.
Sending Attachments
Any number of files can be sent as attachments along with the email. The files to be sent must exist on the server. The following sequence of folders are checked for the files to be attached:
- By default, you should save these files within the data/mailform folder (under the private_data site folder).
- If the file to be sent is not found within data/mailform, the system will check for the file (including the supplied path) under the data folder directly.
- If the file is still not found, and the attach file name contains a slash, the portion of the file before the slash will be treated as a folder identifier and the remainder will be the path and file within the folder.
Here we see an example:

First the system will resolve the dollar function. Suppose invoice number is 12345 and the site directory name is mysite.
First the system will look for file [base]/private_data/mysite/data/mailform/receipts/12345.html
If the file is not found it will check for [base]/private_data/mysite/data/receipts/12345.html
If the file is still not found, "receipts" will be passed to the site class method get_site_path and will resolve to directory [base]/private_data/mysite/receipts and the system will check for file [base]/private_data/mysite/receipts/12345.html. This third method would be used for files that are stored under the docs public_html folder. For example, Attach File name "docs/instructions.pdf" would be converted to [base]/public_html/mysite/docs/instructions.pdf.
Calling Mailform Programmatically
Let's suppose your mailform definition appears as follows:

In most cases your mailform object will be linked to a transaction object so that no programming is needed to send the email. Occasionally, you may also want to call a mailform object programmatically. If your mailform definitions contain references to session variables, you will need to make sure these are assigned before calling the send_mail method of the mailform object. Here we show an example of this:
require_once CLASS_PATH.'mailform.php';
// Usually these session variables would be populated
// from data on a form or from the database.
// Start the session if you want the session data
// to be preserved beyond the current request.
$this->site->start_session();
$_SESSION['invoice_number'] = '20168';
$_SESSION['first_name'] = 'Fred';
$_SESSION['last_name'] = 'Flintstone';
$_SESSION['email'] = 'fred@bedrock.ca';
// Instantiate the payment mailform object and
// use it to send an email
$mailobj = new mailform($this->site);
$mailobj->load_form_info('payment');
$mailobj->send_email();