The video model is used to render HTML 5 video tags such as the following:
<video id="video_keeping-rain-off-your-rv" controls preload="metadata" width="450">
 <source src="video/use-pool-noodle-to-keep-rain-off.mp4" type="video/mp4" />
Your browser cannot play mp4 files.
</video>
To generate a video tag you first define the video files and options for the tag using the video model, then you can render the video tag on any webpage by using the $video function.
Uploading Video Files
Video tags reference video files that must be created in advance of using the video model. The video model supports four different video file formats as we can see here:

It is generally a good idea to convert your files to several different formats in order to support the most number of browsers and devices. At a very minimum, we recommend creating an mp4 file since most devices support this format. Once you have the video files stored on your local device, you can proceed to upload them to your server by following these steps.
After opening a new video model, click on the magnifying glass next to the video file you want to upload.
This will pop up a window that allows you to select a file from the site's public video folder. If you have never uploaded a video file before, you may get a warning indicating that the video folder does not exist. This should be followed by another message indicating that the folder was created as shown here:

Since the video folder had to be created, it clearly contains no video files from which to select. You must proceed to upload the files in order to select them. To do so, click on the Choose Files button and navigate to the local folder that contains the video file(s) that you want to upload.
Video files can be quite large so we do not recommend uploading more than one video at a time. You will need to make sure your php.ini config file allows you to upload the size of video you need (see UPLOAD_MAX_FILESIZE) and also allows post messages large enough to contain your uploaded video (see POST_MAX_SIZE). After choosing a file and clicking on the Upload Files button you should see the file upload progress for a period of time followed by a successful upload message like this:

After your file has been uploaded it should appear in the list to be selected. Select the file to be returned to the video model.
If your video file is available in several different formats, you can repeat the above process for the other file formats that you want to support.
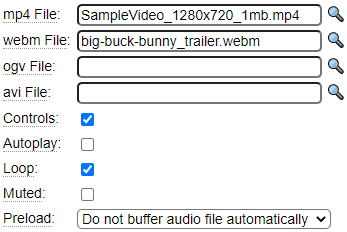
Other Settings
Refer to the HTML 5 video tag specification to learn about the other options that can be specified for an video tag and set these as desired. Here we see the main parameters used by the video model.

Controls
Normally you will select the Controls option so that the rendered video tag will include the controls that will allow the user to control the video play and volume.
Autoplay
It is generally poor form to play videos automatically when a page is loaded. Even when autoplay is enabled some browsers will choose to ignore this option and require the user to manually start the video.
Loop
Choose this option if you want the video to continuously restart after it completes.
Muted
This can be used to play the video without sound initially until the user unmutes the video.
Preload
Preloading images will save time when the user decides to play the video however this will also use up bandwidth even if the user never elects to play the video.
CSS Class
You can enter one or more CSS class names here to style the video. If you want to set the width dynamically based on the size of the user's screen you could configure these styles using media queries.
Local Styling
This field can be used to add styling to be loaded whenever the video is rendered. If you have indicated CSS Classes above, these class definitions can either be added to one of the page's stylesheets or they can be styled here.
Width
Width can be used to set the video to a fixed width (in pixels). The can be adaptable to allow desktop devices to render a wider video than phone devices.
Poster Image
A poster image allows you to show a static image to represent the video before the user plays it. This can be used to give the user a hint about what the video is about. You must define this image in advance using the image model.
Poster Image Size
The size of the poster image should coincide with the size of the video container for the specified device.
Unsupported Browser Content
If the users browser does not support the video tag or the available video formats you can indicate a message or image to be shown in place of the video.
Transcript Options
Transcripts allow you to associate written text with your video files. This is helpful for SEO purposes as well as serving those who are hearing impaired.
Begin by creating a transcript file in notepad or some other text editor and save this as a .txt file. When you click on the magnifying glass next to the transcript file name you will be able to upload this text file just like you did with the video files. You can also set the width and height of the transcript div container and indicate where the transcript should be shown in relation to the video. These settings can differ for phone devices vs. desktop devices.
Track Information
The Track Information grid can be used to provide track information associated with the video. Here we have specified the name of a vtt file that will be used to overlay subtitles on top of the video. Refer to the html video documentation to learn about other types of tracks that are possible.

Rendering the Video Tag
Video tags are rendered using the $video function. Let's suppose the above specification was stowed under the name keeping-rain-off-your-rv, we could render this video and the related transcript on any page by using the dollar function $video(keeping-rain-off-your-rv). You can also pass additional parameters to override the defaults set on the video definition. For example, $video(keeping-rain-off-your-rv,autoplay:true,loop:true,controls:false)
When we look at this page in a web browser we will be able to play the video file and review the transcript file as shown below. Notice that the video is also overlaid with subtitles from our vtt file.