PayPal is a popular method of accepting payments since it is fairly easy to set up and does not require your site to be PCI compliant since all of the credit card handling occurs on PayPal's site, not the merchant's site. The main disadvantage of using PayPal is that they do not refund transaction fees when customers return items or request refunds.
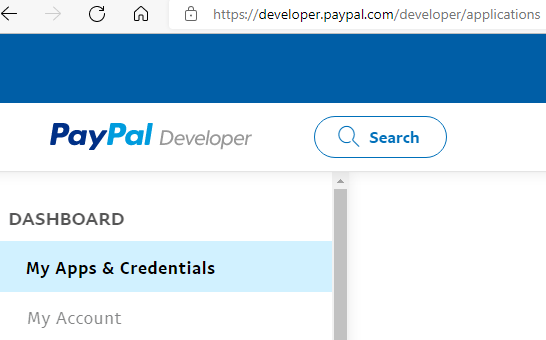
If you plan to allow PayPal as a payment option you will need to register for a Business Account in PayPal. Once you are registered you can go into PayPal's Developer Portal and navigate to the Apps & Credentials page.

You will must define a REST API App like the one shown here:
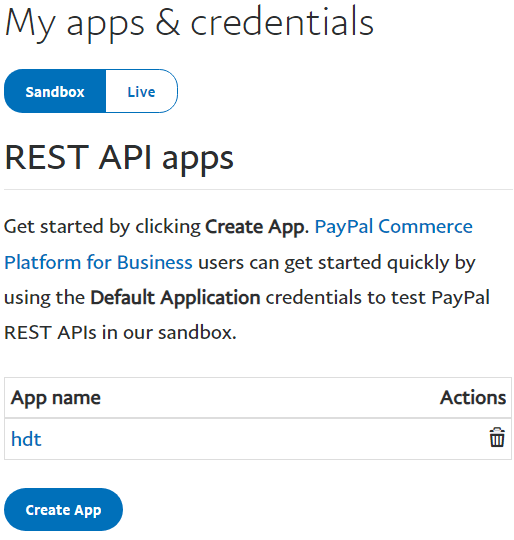
You should create both a Sandbox and a Live REST API App using PayPal's developer portal. In each case, PayPal will generate a Client ID and a Secret Key. Copy these keys since you will need the client_ids later when building the PayPal integration into your site.
Please refer back to this page for details on how you render the PayPal link on your page. We show how you can generate both a Credit Card link and a PayPal link with one set of code. If you only want the PayPal link (and not a link which allows for a direct credit card payment option) you won't include the $sss(show_payment_required,cc_form) function but the rest of the page should be the same.
Typically users will launch PayPal from your site by clicking on a button that looks something like this:

Behind the scenes there is a lot happening to render the code to produce this button. This is because the button is designed to pass a lot if information to PayPal such as:
When the PayPal button is clicked, all of this information is passed to PayPal so that the correct amount is paid and PayPal can capture certain details concerning the payment.
Consider the following diagram that shows the interaction between your site and PayPal.
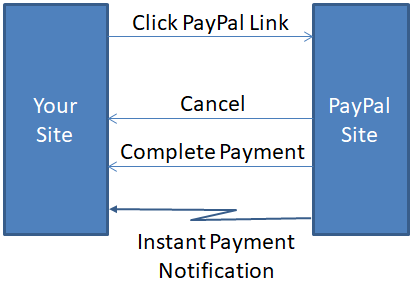
Let's review these linkages.
When the user clicks on the PayPal link, they leave your website and navigate to the PayPal site while providing PayPal with details summarized above.
If the user decides not to pay, PayPal navigates back to your site. You must supply PayPal with a URL on your site to which the user will be redirected if they decide not to proceed with their payment. Normally, the cancel page will inform the user that they have not completed their payment and provide them with options for paying later. To see a sample page to be used for cancelled requests invoke the tags model and enter the command example payment-cancelled.
If the user completes their payment, PayPal will redirect the user back to your site. Again, you must tell PayPal which URL to launch after a successful payment. Often this page will thank the customer for completing their purchase and release any resources that are no longer required in the user's session. It is important to note that it is very easy for hackers to navigate to this "payment completed" page without actually making a payment. Therefore, you should never perform any processing or business logic within this page that assumes that a payment has been made. Instead, any such processing must go in the Instant Payment Notification described next.
To obtain a sample payment acknowledgement page edit the tags model and enter the command example payment-acknowledged.
PayPal offers a feature whereby it can perform an HTTP request to your site to alert you to certain transactions. This is much more reliable than simply linking back to a page on your site since Instant Payment Notifications include handshaking designed to ensure that the request is not spoofed. Therefore, this is the point where we want to process our payment and trigger any action such as alerting our shipping department to process an order.
Since Instant Payment Notification handling can be quite tricky the GenHelm framework seeks to handle most of the functionality associated with payment processing generically using a system page named paypal_notification. In most cases, this generic page can be used to handle PayPal callbacks rather that writing a custom page for this purpose. If you need to perform special handling when a payment is made, this logic should be written within the payment_callback_class designated within the payment_config file described here.
If you have set "update_text_based_account" in your payment_config file, the default behavior of the paypal_notification custom page is to accept the payment details and find the text-based accounting record associated with your customer and apply the payment to their account. The paypal_notification class calls another system class named process_payment. If you are implementing a database oriented solution you can copy the supplied process_payment specification from system to your site. If you are implementing a text based accounting solution you can keep the existing process_payment in system and supplement its behavior by adding a payment_callback class. This same class will be called to process payments irrespective of where or how the payments occur.
Your callback class should reside within your site's classes/invoice_admin folder and should include a function named process_payment which accepts the following parameters.
If your callback class defines a method named set_metadata, this will be called while passing a keyed array that originated in the code that instantiates the cart_select_pay_method.
Instant Payment Notification (IPN) processing can be complicated and difficult to debug since this code is normally executed in the background so you don't have much visibility into the code execution. Therefore, the GenHelm frameworks provides a lot of features that allow you to test this functionality without having to complete payments in PayPal. Normally these features are only activated within your sandbox environment however it is also possible to use these within production if needed.
While generating the PayPal checkout link you can also render a test link, like the one shown below, that can be clicked to simulate what happens when PayPal notifies your site of a payment.

This button submits a form which contains all of the fields that normally come back to your site in a post request from PayPal. Many of these values originate from the information that you send to PayPal so it can be helpful to see these values to make sure that you are providing PayPal with the correct information. One of the debug features you can activate causes these values to be shown below the simulate button as (partially) seen here:
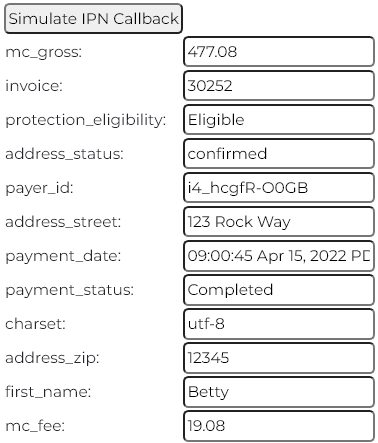
You can change these values to simulate different scenarios.
If you are just setting up IPN behavior for the first time it can be helpful to receive an email every time a request is processed to ensure that payments are being handled as expected. Once you are confident that things are working properly you can disable these email notifications by simply changing a config file and promoting this to production.
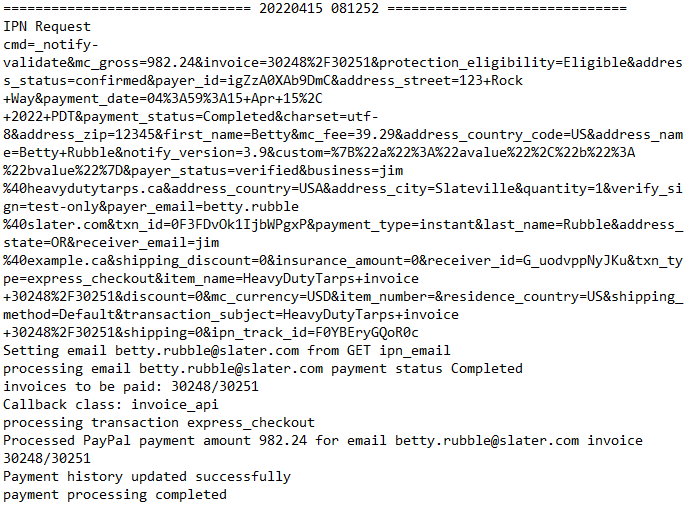
Another feature of the default paypal_notification page is that it can write a log record for every transaction processed. It is a good idea to keep such a log in production in case you ever need to investigate a problem with a payment. Here is an example of the data that is logged:
When using PayPal, you will need an additional configuration file in addition to the payment_config and payment_notifier_config files. Here is an example of the paypal_config file.
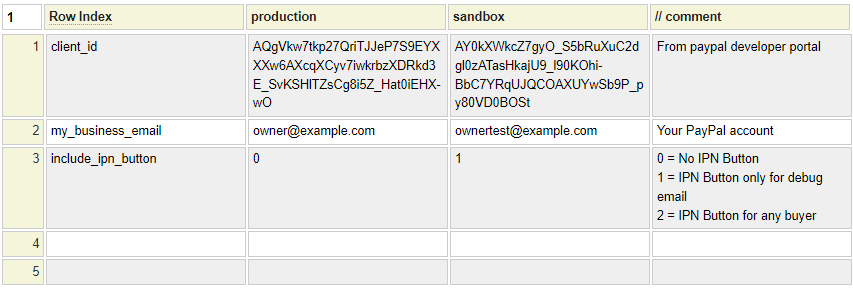
Let's review these settings:
The client_id must be obtained from the PayPal developer portal when signed into your account.
This is the email address associated with your PayPal account.
Set this option to 1 if you want to show the Simulate IPN Callback button only when placing orders using the test buyer indicated by the config email address debug_purchase_email set within the payment_notifier_config file. Set this option to 2 if you always want to show the Simulate IPN Callback button. Option 2 would normally only be used in sandbox environments.
To show all all the values that will be using in the Instant Payment Simulation set the debug_sandbox option of the payment_config file.
To save the paypal_config file follow these steps.
Click here to return to the collecting payments help.