Stripe is a popular payment gateway due to the number of different credit cards and currencies that it supports as well as its back office features. Theoretically, Stripe can be used to store all of your customer and order information, handle your invoicing, etc. This is a good option if you have limited resources to build what your need into your own back office. The risk of leveraging Stripe to manage all of your back office information is that the closer you tie your systems to Stripe, the more difficult it will be to switch payment providers. One of the main drawbacks of Stripe is that they don't refund the fees on returned or refunded orders. Therefore, if your refund rates are high, it might be cheaper to switch to a provider that offers full refunds for cancelled payments (as the Credit Card companies themselves do). Another drawback of using Stripe is that it does not eliminate the requirement for your website to be PCI compliant. If does reduce the threshold of the PCI measures you must take since you won't have any direct access to credit card details on your site.
By default, the GenHelm framework offers support for Stripe Payments but does not have built-in support for saving customer and order information within Stripe.
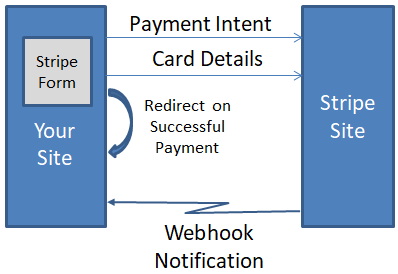
Please refer to the following diagram which shows the typical flow of a Stripe payment.

In order to use Stripe you must set up a Stripe account using the Stripe Dashboard to obtain six codes consisting of three production codes and three test codes. You will use this toggle on the Stripe portal to switch between production information and test information.

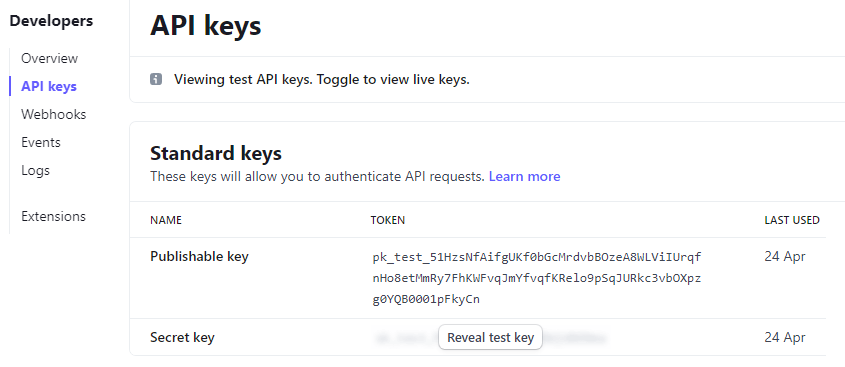
In each mode you will go to the API keys section to determine the keys that you will need to communicate with Stripe. Notice below that the Publishable Key is revealed by default. To see the Secret Key you must click on the Reveal button. Copy and paste these keys into a text file making sure to label which keys are for production and which are for testing.
In order to obtain the webhook key you must add a webhook endpoint in the Webhooks area of the Developer's dashboard. Once again you should add separate endpoints for test and production. The test endpoint will reference a URL in your sandbox environment and the production endpoint will reference a URL on your live website. In each case, the URL will look like the following:
https://[your-domain]/index.php?page=payment/stripe_webhook&ajax=1
Let's break this down:
Here we show the Stripe form where you will add your endpoint:
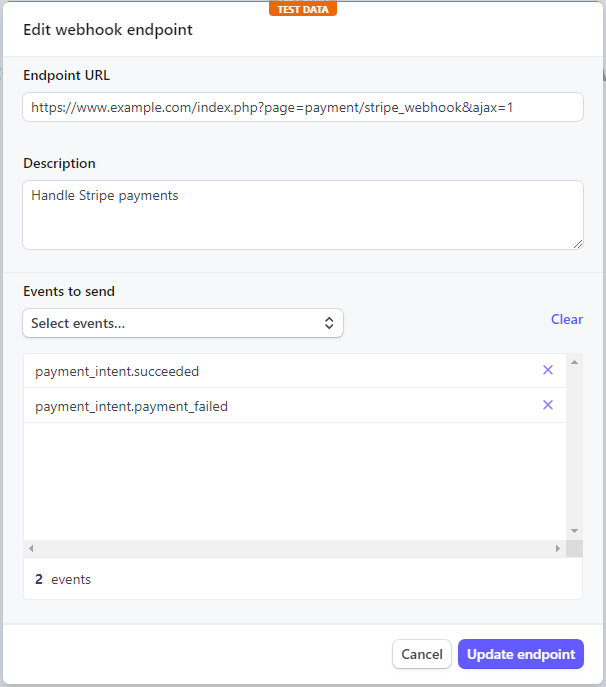
You can add as many different events as you want. Stripe will call your webhook for each event selected. If you a managing accounting data within your site or if you perform other automated processes when payment is received you will generally want to subscribe to one of the following invoice events:
You should only subscribe to one of these events since most payments can trigger both of these events to fire and you want to avoid double processing payments. The payment_succeeded event is triggered when an onlne payment is completed. This will also trigger a paid event. On the other hand, Stripe allows you to mark an invoice as Paid even when no online payment is applied. For example, if the customer gives you cash or a check, you could mark an invoice paid. Doing so, will trigger the paid event but not the payment_succeeded event. In summary:
If you want to record refunds within your on-site accounting system you should also register the "charge.refunded" event.
If you are not planning to maintain any accounting data on your site, or perform any other automated processing upon order payment, you don't actually need to define a webhook at all.
Once your webhook has been created you will need to reveal the Signing Secret key. Copy your test and production Signing Secrets to a text file.

If you are using Stripe Webhooks, we recommend following the procedure set out in the main payment help to configure debug options and log Payment Notifications. Since Stripe Webhooks call your site in the background adding this logging will give you more visibility if you discover that payments are not being processed as expected.
Additionally, when processing payments via Stripe the following config settings must be defined within the stripe_config file.
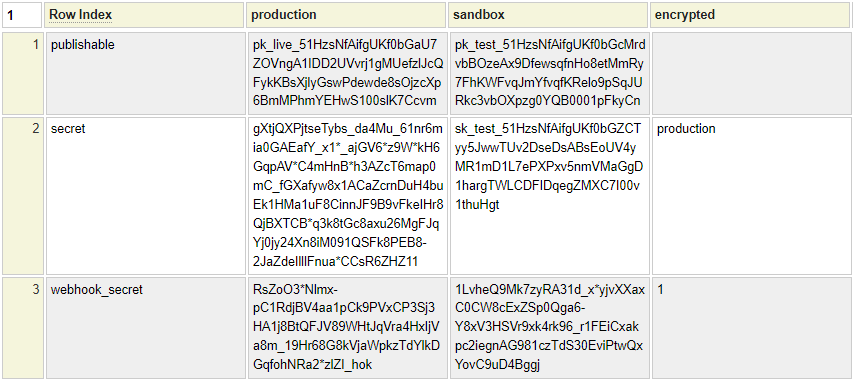
Let's review these config settings next. Note that you can also have a 5th column with a heading that begins with //. This is used to define columns within the php_array_data model that are to be designated as comments.
Use the encrypted column to indicate whether the information in the production and sandbox columns is encrypted. Enter one of the following values:
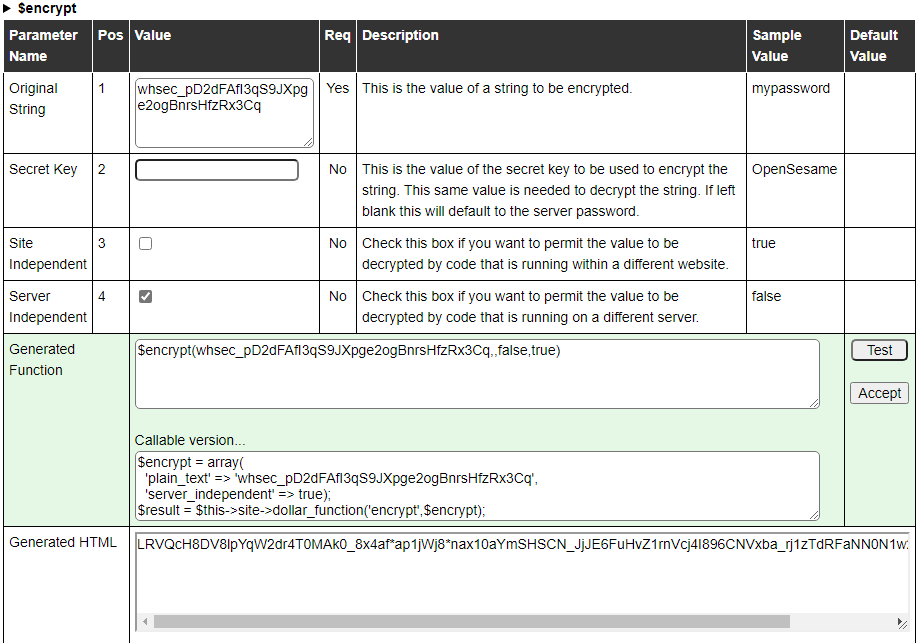
To encrypt a key enter $encrypt() somewhere on the page then place your cursor on this function and enter <ctrl>g to launch the help for this function. Then enter the key supplied by Stripe and check the Server Independent option and press the Test button. The encryption needs to be server independent since you normally will be generating your production keys from within your sandbox environment. You can copy either the Generated HTML or the Rendered HTLM value.
The first two rows are required. The remaining row is only needed if you are using webhooks.
These values come from API keys section of Stripe's developer portal. Use Test Mode to generate the sandbox keys. These are the Publishable key values.
These are the Secret Keys you copied from Stripe's Developer portal. It is a good idea to encrypt your production key. In the example above, since the encrypted column shows production, this means that only the production secret key has been encrypted.
These values come from the Webhooks link on Stripe's Developer Portal. Consider encrypting your production key. In the example, since the encryption column is set to 1 (true), both the production and sandbox keys have been encrypted.
To save this config file you can follow these steps:
When using Stripe, we will change the initiate-payment form to include the ability to accept the credit card details directly, rather than asking the user to choose their payment option. Here we show an example of this form created using the bootgrid model:
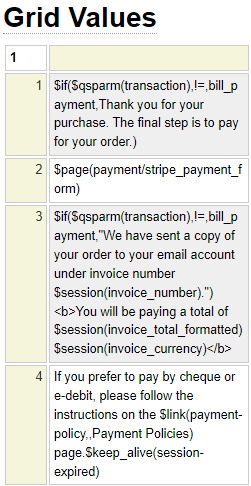
If you want to build such a page you can do so by launching the bootgrid model and entering the command example stripe-payment-form.
The key component of this page definition is a reference to $page(payment/stripe_payment_form). This will embed a payment form using a form defined within the system pseudo site. Here we see an example of the rendered page.
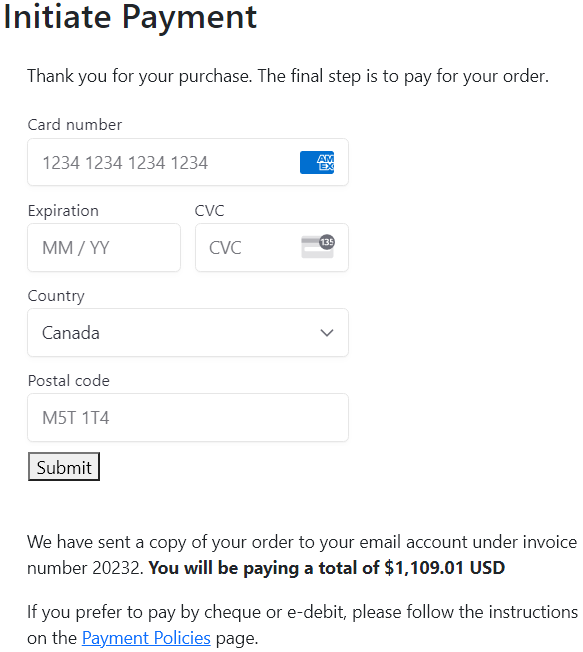
This form is different from the forms that you normally work with in GenHelm in that it is built dynamically by JavaScript provided by Stripe. Therefore, you won't be able to write code within your form handler to interact with the form fields. Instead, your form handler only needs a single method named initialize. Let's review the form handler next.
You must supply a form handler named stripe_form_handler to interface with the form shown above. This form handler uses some framework code to interface with Stripe so that most of the logic is handled for you. Generally, your stripe_form_handler class only needs one method named initialize. This method is called for both get and post processing. Here we see an example of this method.
function initialize() {
// Initiate the stripe support class
require_once CLASS_PATH.'paymentgateway/stripe_payment.php';
$stripe = new \system\stripe_payment($this->site);
$name = empty($_SESSION['company_name']) ? '' : $_SESSION['company_name'].' - ';
$name .= $_SESSION['first_name'].' '.$_SESSION['last_name'];
// Set the page to be redirect to upon a successful payment
$stripe->set_confirmation_page('payment_confirmed');

// Define the customer and payment information
$stripe->set_customer_email($_SESSION['email']);
$stripe->set_email_receipt(true);
$stripe->set_currency($_SESSION['currency']);
$stripe->set_amount($_SESSION['invoice_total']);
$stripe->set_metadata(array('invoice' => $_SESSION['invoice_number'], 'name' => $name));
$stripe->set_statement_descriptor_suffix('Inv. '.$_SESSION['invoice_number']);

// The 2 fields below can only be set if you fully integrate with Stripe to have it
// manage your customers and invoices
//$stripe->set_customer($name); This can only be set if customer defined in skype
//$stripe->set_invoice($_SESSION['invoice_number']);
$script = $stripe->get_client_script();
if ($script === false) {
	$stripe->transfer_your_messages_to_me($this->form);
	return false;
}
$this->form->add_script('stripe_submit',array('javascript'=>$script,'placement' => 'bottom'));
}
Let's review a few aspects of this code.
If the user completes their payment, the payment page will redirect to the page you designated as your confirmation page. Often this page will thank the customer for completing their purchase and release any resources that are no longer required in the user's session. It is important to note that it is very easy for hackers to navigate to this "payment completed" page without actually making a payment. Therefore, you should never perform any processing or business logic within this page that assumes that a payment has been made. Instead, follow the process of defining callback classes via webhooks defined below.
To obtain a sample payment acknowledgement page edit the tags model and enter the command example payment-acknowledged.
Stripe is able to send an email receipt to the customer upon a successful payment. To activate this feature call the set_email_receipt method as shown above.
The set_metatags method is used to assign a keyed array of values that will be passed to your callback class for certain callback events, such as invoice.paid.
Processing webhook events can by tricky because these happen in the background so you can't step through the code using a debugger as you would when developing other complex processes. Stripe offers a Command Line Interface (CLI) that might help but this can also be tricky to use and set up.
To make this process easier, and also to keep track of the events that Stripe has sent to your website, the GenHelm framework saves these events in text files and allows you to reprocess the events within the sandbox environment. Stripe, itself, allows events to be resent in both production and test mode so if you need to resend an event to your production server you would do so in Stripe.
After configuring the events you wish to subscribe to in Stripe, and setting up the necessary passwords and configurations in GenHelm, try processing some sample payments, refunds, etc. within your sandbox environment. This will save all of these webhook events as json files on your web server as shown here:
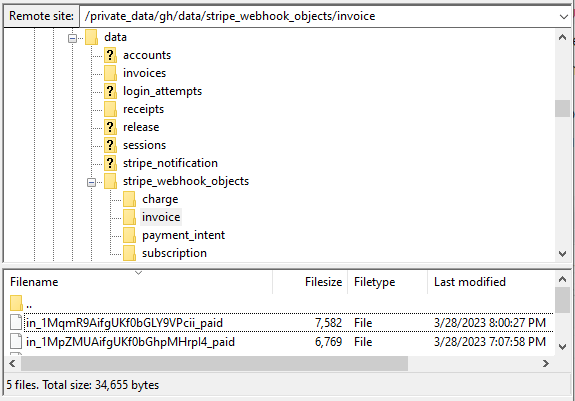
Notice that the json files are saved under the data/stripe_webhook_objects folder of your site. The next level under this folder defines the stripe object name that has been saved. The name if the json files coincides with the object id followed by an underscore then the last part of the event name
Within your sandbox environment, you can reconstitute these saved events by adding the following parameters to the query string:
object
The name of the object, for example, invoice, charge, etc. Note that some objects need to be qualified, for example customer.subscription.
id
The id of the object. For example, in_1MqmR9AifgUKf0bGLY9VPcii_paid.
result
This is the last part of the event name. For example paid, created, etc.
unique
This is only required in cases where there are duplicate saved entries for the same object id. When this happens, a unique identifier is added to the end of the saved file name. To request this specific version of the event, you must pass the matching unique identifier.
Here we see a sample query string:
http://[sandbox-subdomain/payment/stripe_webhook?object=charge&id=ch_3MpwHDAifgUKf0bG02wxlPZP&result=refunded
Requesting this link will cause the page to load the specified Stripe object from the saved file. This makes it easy to step through the request using your PHP debugger to better inspect your code. Of course you should also test the actual Stripe Webhook callbacks however it is easier to debug your code in isolation of Stripe first by using this simulated webhook test, then, once you feel this is working as expected you can trigger actual Stripe Webhook callbacks by completing payments in the sandbox.
Please review the following diagram that shows how your site interacts with Stripe Webhooks:
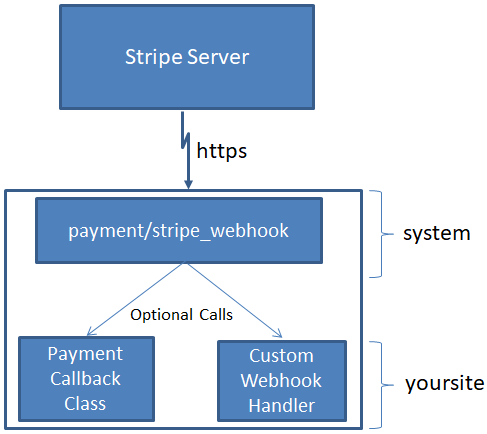
Note the following:
If you are using the text-based accounting files, these can be automatically updated by the supplied payment/stripe_webhook page. If you don't need to perform any other automated processing you may not need any callback classes.
If you need to perform certain automated processing whenever a payment is made you will likely want to integrate a callback class into the generic webhook handler by specifying the class to be called within the invoice_admin/payment_config definition. This class could also be used to update database oriented accounting records if your have implemented this.
If you have configured your webhook in Stripe to call back to your site for many different events you can create a custom class that will be called to handle these events. Your handler will perform processing to supplement or replace the default handling described above. When writing your own handler you have two different options:
You can actually combine these options by having specific handlers for some events and a generic handler for other events. For example, if you define a class named stripe/payment_intent, this class will be called when processing webhooks pertaining to payment_intents. On the other hand, if you have subscribed to charge events and you have not written a class named stripe/charge (and you want to code for this event), you must define a class named stripe/webhook to be used as the alternate class name.
Here is an example of a custom webhook handler:
function process_request($event,$event_obj) {
  switch ($event['action'].' '.$event['action']) {
    case 'invoice paid':
        // Custom handling for a successful payment
        if (some_error_condition) {
          $this->message = 'Message to be written to the log file on failure';
          return false;
        }
        else {
          return true; // Success
        }
      	break;
    case 'charge refunded':
        // Custom handling for a refund
        return true
  }
}
Note the following regarding this sample code:
You can load a sample webhook handler by using the command "e php_class" followed by "example stripe_webhook".
Note that GenHelm supplies specific helper classes to make it easier to work with common Stripe objects including these:
The $event_obj variable is actually a reference to a GenHelm wrapper class that wraps the Stripe json object. When using these classes, you can generally use the get_[property] method to get a desired property from the object. If you are working with a Stripe object not listed above, this is handled by a generic handler named stripe_object_base. You can create your own helper classes that extend this class if you wish. All of these classes are located within the private_data/system/classes/stripe folder.