Overview
The image model is extremely powerful. This model serves four main purposes:
- It can be used to generate various sized images from an uploaded original image or a screenshot.
- It provides the information used by the $image function to generate an img tag.
- It defines images used by other models such as bootcar and swiper.
- It can be used to shrink, crop and rotate images.
Responsive vs. Adaptive Images
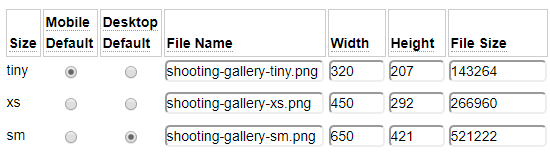
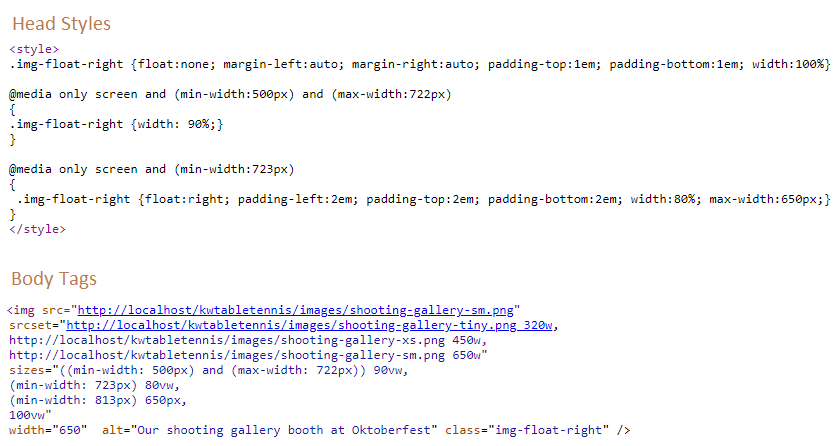
The image model allows you to create a definition for an image which includes up to seven different sizes. This is useful when implementing responsive images since a srcset definition can be generated to reference a wide variety of image sizes so that the browser can download an image sized appropriately for the user's device. For example, users on wide desktop screens may be presented with large images while users on tablets may see medium-sized images and users on phones and other small devices may be shown small images. The image model makes it easy to configure complex img tags that include the srcset and sizes features that enable browsers to download a version of an image that is appropriately sized for the user's device.
Alternatively, you can render images using an adaptive methodology wherein one size is used on phone devices and a different size is used on desktop (non-phone) devices. With this approach, the srcset and sizes feature is not needed since the GenHelm framework can serve a small image on phone devices and a larger image on desktop devices. Even with this methodology you might want to generate more than two images since the $lightbox function uses image definitions as well to show image enlargements.
Generally, you will want to choose a methodology early in your design since this will influence the numbers and sizes of images that you will need to create.
Defining Srcsets
The image model utilizes srcset definitions created by the image_sizes model. Refer to the help for that model to learn about how srcsets should be defined.
Depending of the nature of the image, you will generally want to define several images of different sizes to optimise the rendering on a wide variety of devices. The different sized images can either be created manually in an image editor such as Paint or Photoshop or they can be generated using the image model itself.
Generating Images
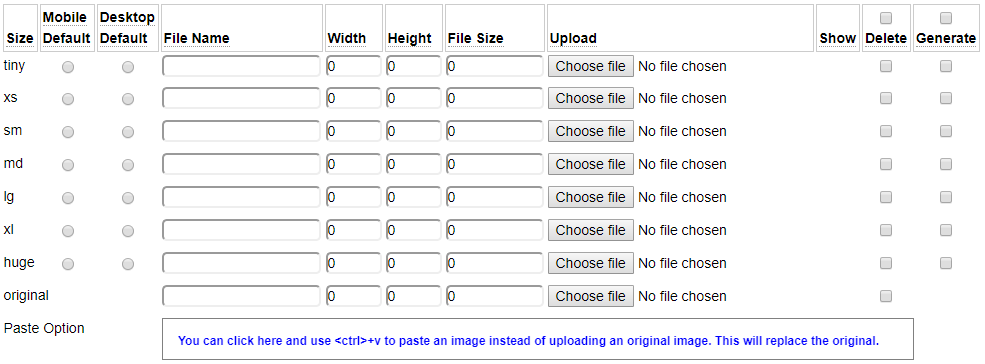
Image generation requires a master image that is defined as an "original" image. Generally, you will want this to be at least as large as the largest image to be rendered on the website. This is because your images will end up being grainy or of poor quality if you attempt to generate large images from smaller images.
All image uploading and generation takes place during stow processing. To stow a new image you generally follow these steps:
- If you have an original image stored on your computer, click on the Choose File button in Chrome/Edge or the Browse button under FireFox to select your original image. This button is on the last row of the srcset definition on the row labelled original.
- Alternatively, if you want to generate your image from a screen shot, use the Windows Snipping Tool or Command+Shift+4 on a Macintosh or select and copy a portion of an image from a photo editing tool to capture a rectangular section of an image in the clipboard. Then paste this in the box to the right of the Paste Option label.
- Next mark all of the images to be generated using the check boxes under the generate column. By default, the image model will only generate images that are no larger than the original image. Therefore, you can click on the Generate checkbox in the heading which will select the generate option for all possible sizes. The larger sizes will be ignored if these are bigger than the original image.
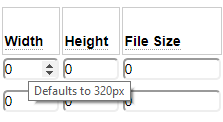
- If you want specific image sizes, you can enter the desired widths under the width column. If you hover the cursor over these fields you will see what image size will be generated by default. The image heights are always calculated automatically so as to respect the aspect ratio of the image. The one exception to this is when you enter a height but not a width. In this case the height will be used and the width will be calculated automatically.
- If you want one of the images to be the exact size of the original image, you can enter 1 in the width field for one of the images to be generated. When generating all images, by default, the size of largest generated image will be adjusted to match that of the original image.
- Use the radio buttons to designate one of the images as the mobile default size and another one as the default size on desktop devices. By default, the smallest image will be designated as the mobile image and the largest image will be used as the desktop image.
- Optionally add an alt property in the image properties section by enter "alt" in the property column and the image description in the Value column.
- Enter the command stow image-name choosing whatever name you wish. You can include folders if these images pertain to a certain genre. For example, stow mesh-tarps/sandbox-covers. Notice that you don't specify an extension such as png or jpg as part of the image name.
This will generate the requested images and save them in the images folder of the site and also save the definition for the image so that it can be rendered using the $image function.
Note that original images are saved under the private_data folder of your site so they cannot be accessed directly from a web browser.
Since any existing width or height shown will be used to determine the sizes of the generated images you should clear these values whenever you want to revert back to the default sizes. The following buttons can be used for this purpose.

Advanced Image Generation Options
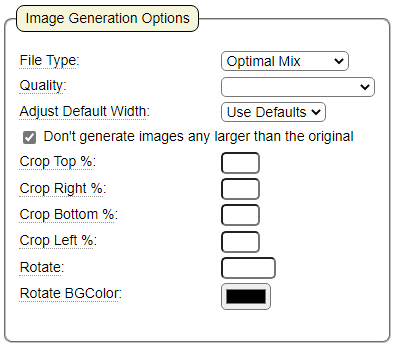
In addition to the standard generation featured it is possible to alter the Image Generation Options to select more advanced features.
These advanced features influence the type, quality, size and appearance of the generated image(s).
File Type
By default, images will be generated using the same file type as the original image. When pasting screen captures into the paste area these snippets have a default file type of png. Unfortunately, when PHP resizes png images the resulting file sizes tend to be inordinately large. For this reason, when choosing the Optimal Mix option in conjunction with png original images, the default behavior is to generate .jpg images except for images whose size matches the original image. Even the matching images will be adjusted to.jpg format if the size of the original .png image is determined to be excessively large relative to the dimensions of the image.
One of the leading causes of slow websites involves rendering large images. Therefore you should always pay attention to the size of the image shown under the File Size column. Generally speaking, the more images you have on your page the more important it is to keep their sizes to a minimum. If your generated images exceed 100K or so, consider ways to shrink the file size. If the generated images are currently type png, try changing the File Type selector to .jpg and place a check next to the images to be regenerated and stow the specification again. Use the Show link next to the images to make sure the visible image quality is acceptable.
Quality
By default, the image quality will be set to 35. If you find that the generated images appear grainy at this default quality setting, try increasing the quality. On the other hand, if you find that the generated images look good but the file sizes are rather large you should consider regenerating the images using a lower quality setting in order to reduce the file size.
Compressing Images Using Tinify
A good option for shrinking the size of your images, while keeping the quality level of the images high, is to use a third-party website, such as tinypng.com, to shrink your images. To do this manually is a rather arduous process since it would involve downloaded the images from your site, uploading them to tinypng, downloading the compressed images and uploading these back to your site. In order to streamline this process we recommend that you sign up for the tinify API so that GenHelm can call upon tinify to shrink your images while working within GenHelm's image model. In the next section we will discuss how you set up and use this feature.
Sign Up for a Tinify API Key
Visit tinypng.com and navigate to the Developer API page. Enter your name and email address to obtain an API key. Currently, this API allows you to compress up to 500 images per month at no cost, so you don't need to provide your credit card details unless you plan to shrink more than 500 images.
Add the API Key to Your GenHelm Config File
Your config file is stored within the private_data/system/config folder. Add a line to this config file that looks like this:
$this->setconfig('tinify','apikey','your-api-key-provided-by-tinypng.com');
Select Tinify from the Image Quality Selector
GenHelm does not call tinify unless you explicitly request this by choosing the option shown below.
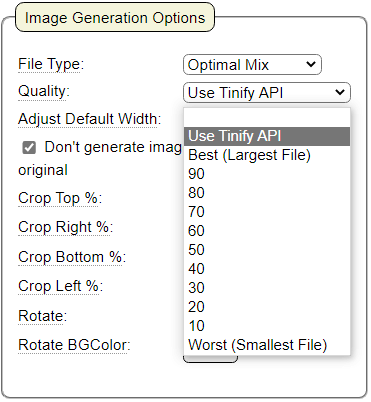
Another advantage of using tinify is that it will preserve png image transparency, which may not be the case when using GenHelm's default image generation capabilities. When using tinify, the type of image will always be the same as the original, regardless of the image type you choose. If you wish to change types, you would need to do so while not using tinify then you could use tinify to compress the image after you have changed its type.
Compessing Images Without Generating
Sometimes you may want to compress images that have already been uploaded or generated (rather than using an original image to generate a new image). In such cases you can enter a width value of -1 next the existing images to be compressed by tinify as shown below.

This feature is only available if you have configured a valid tinify API key however it is not necessary to set the quality value to "Use Tinify API" to use this image compression feature.
Adjust Default Width
Recall that you can determine the default widths that will be generated by hovering over the width fields.
Depending on the nature of the images you are generating, these defaults may be too large or too small. For example, if you are generating a background image intended to fill the entire screen, you may find that you would like the defaults to be larger. On the other hand, if you are generating a small "head shot" you will find that the default sizes are too large. The Adjust Default Width feature allows you to automatically increase or decrease the default sizes just by changing this single value.
Don't generate images any larger than the original
By default, when choosing all of the Generate checkboxes while leaving the width and height values at 0, the system will only generate images up to the size of the original image. You can uncheck this option if you want to generate images that are larger than the original but be aware that these images will tend to look grainy or be of poor quality.
Cropping Images
If your original image contains content on one or more edges that you do not want to include in the generated images, you can specify a crop percentage to cut this out of the generated images. This does not crop the original image, only the generated images will be affected.
Rotating
If your original image is not at the correct angle of rotation, you can rotate it up to 359 degrees. When rotating images, you can also specify a background color to be used to fill the "white space" introduced during rotation.
Deleting Images
If you have uploaded or generated images that you no longer need, select the delete check boxes next to the images that you want to remove then stow the image definition. This will physically delete these images from the server.
Uploading Images
If you have created images that you want to use on your site using Photoshop or some other image editing tool, you can upload these images by clicking the buttons under the Upload column. After selecting all of the images to be uploaded, enter the stow command to upload and save the images and the image definition.
Image Properties
The image model allows you to enter any html property that you would like to be generated as part of the img tag. For example, if you want to execute some JavaScript when the user clicks on the image you can enter onclick in the Property column and enter the desired script in the Value column.
You can also enter pseudo properties that are used by the $image tag or other dollar functions or models. Pseudo properties all begin with an asterisk (*). For example, the $imagelink model needs to know that page you want the image to link to. This would be specified using the pseudo property *page.
Generating srcset and sizes
The Image Sizes value refers to a separate definition that you will create using the image_sizes model. By default, all of the images that you define will be included in the generated srcset definition. Sometimes you may define images for other purposes which you don't actually want to include in the srcset list. In such a case, you can use the Srcset Sizes Mobile and Srcset Sizes Desktop settings. These settings allow you to specify a range of image sizes to be generated into the srcset definition for the specified device.
Base File Name
Normally the names of the generated images coincide with the name of the image specification. If you want, you can use the Base File Name field to override the names of the generated images.
Allow Image Stretching
This option controls whether the width property is included in the generated img tags.
AMP Image Layout
This feature is used in conjunction with Google's Accelerated Mobile Page rendering capability and should only be used if you are planning to deploy your site with AMP support.
Thumbnail Images
While you are maintaining an image spec, a thumbnail of the current image will be shown to you provided the smallest available image is less than 50K in size. For this reason, you might want to reserve the "tiny" image for the purpose of showing the image in the viewer. If the small image is not shown, you can crop, shrink or reduce the quality of this image so that it is under 50K.
scratch Command
If you no longer need a set of images you can use the special command scratch to remove the images referenced by the current definition as well as removing the image definition itself. All models support a delete command, for example, delete = will delete the currently loaded specification and related generated components. In the case of image definitions this will not delete the physical images associated with the specification. You can use the scratch command instead of the delete command if you want to delete not only the current image specification and definition but also all images referenced by the definition. Be aware that this includes the original image so you won't be able to regenerate the images from the original after using the scratch command.
Special Image Properties
Image tags support several extended properties that can be used to add image embellishments or to support various models or dollar functions that use images. Here we discuss the main properties.
*caption
Setting the *caption property causes the image to be rendered within a figure tag. The supplied caption will be used to set the figcaption element. When using this property you can also set *caption-class and *figure-class to style the figure elements.
*href, *page, *mysite-document
When images are rendered using $imagelink they require a setting from which an href anchor can be established. Use *href to link to a 3rd party URL. Use *page to link to a page within the current site and use *mysite-document to reference a document, such as a PDF, located within the current site's public docs folder.
When using these options you can also set *target to control whether to open the linked content within a new window. Use _self to open the document in the current window or _blank to open in a new window. By default, site pages open in the same window and 3rd party content opens in a new window.
When using *page, you can also use *page-parms to pass query string parameters to the page.
*lightbox-caption
*lightbox-caption can be used to assign an image caption when images are rendered using the $lightbox function.
*image-sizes
Can be used to override the image's image_sizes value.
*long-description, *short-description
Certain models, such as swiper and bootcar allow you to supplement images with other content associated with the image. For example, these descriptions can be set to overlay content onto the image.