In this help we describe other methods that a model can implement over and above the required generate_code method. All of these methods are optional however you should consider implementing methods that improve your users' productivity when working with your model.
spec_validation($spec_name)
Sometimes errors may exist in the information developers enter into a specification. These errors should be identified in the spec_validation method. By validating here, instead of the generate_code method, the validations will be triggered if the user enters the check command. In addition to setting messages that describe the errors that have been detected, this method should also increment the variable $this->validation_error_count for each error encountered. The method should return false if the errors need to be addressed before proceeding to stow the specification. Return true if the specification passed all validation.
Here is an example of this method.
function spec_validation($spec_name) {
$spec_row = $this->get_spec_row('model_image_sizes_flexgrid');
$last_row = sizeof($spec_row) - 1;
foreach ($spec_row as $key => $col) {
  $size = $col['width'];
  if ($key === $last_row) {
    if (!empty($col['media_query']) or empty($col['width'])) {
      $this->assign_message('image_sizes',2000,false,
        'The media query value is not permitted on the last row, this row should only contain the default image width to be used.',
        __LINE__.' '.__CLASS__);
      $this->validation_error_count++;
    }
  }
  else {
    if (empty($col['media_query']) or empty($col['width'])) {
      $this->assign_message('image_sizes',2001,$col['#'],
        'All rows, except for the last row, must contain both a media condition and a width setting. Please correct row :1:.',
        __LINE__.' '.__CLASS__);
      $this->validation_error_count++;
    }
  }
}
if ($this->validation_error_count === 0) {
  return true;
}
else {
  return false;
}
}
This validation is used by the image_sizes model. This model uses a two column flexgrid wherein column 1 is used to enter media queries and column 2 is used to enter width definitions. This code checks to make sure that the last row only contains a width value (and no media query) and that all other rows contain both a media query and a width.
In most cases you will want to use the messages model to define the error messages used in your validations. Generally, the messages specification name should be the same as the model name being validated unless you want to share common messages across multiple models.
This method returns false if errors were detected and true otherwise.
When assigning messages it is also possible to associate the message with a particular field by following the assign_message method with the assign_mesage_field method as shown here.
$this->assign_message('page_spec',2408,'_'.$page_name,
                      'Non-production pages should be named starting with _ to differentiate them from production pages.',
                      __LINE__.' '.__CLASS__);
$this->assign_message_field('common','browser_restrictions');
The second parameter to this method is the name of the field to be associated with the message. The first parameter can be used to qualify the field. When a field name is referenced the main message area does not show the specific message. Instead, the main messages refer to detailed messages within the specification area of the page as shown here:

The user must scroll the page to see the actual message(s):

change($from,$to)
Models can support a find/replace feature by implementing a change method. This will be called when the user enters a command such as change old new. The old and new values will be passed as parameters to the change method as shown here.
function change($from,$to) {
    $this->generic_flexgrid_change('model_faq_flexgrid',$from,$to);
    return true;
}
In this example we make use of a base method called generic_flexgrid_change that will apply the changes to all entries of the supplied flexgrid. If your model uses several flexgrids, you will call the generic_flexgrid_change for each grid that could be changed by the change command.
This next example shows how a change method is used to update two textareas
function change($from,$to) {
    $this->execute = str_replace($from,$to,$this->execute,$changes1);
    $this->miscellaneous_functions = str_replace($from,$to,$this->miscellaneous_functions,$changes2);
    $changes = $changes1 + $changes2;
    if ($changes) {
        $this->assign_message('spec',1016,array($changes,$from,$to,'the custom code'),
		':1: occurrences of ":2:" were changed to ":3:" in :4:',__LINE__.' '.__CLASS__);
	$this->set_spec_changed_msg(true);
    }
    else {
        $this->assign_message('spec',1017,array($from,'the custom code'),'No occurrences of ":1:" were found in :2:.',__LINE__.' '.__CLASS__);
    }
}
Notice that we pass a third parameter to the php str_replace function so that it informs us as to the number of replacements. We use the total number of replacements to set a suitable message. If replacements were performed, we also need to call the inherited method set_spec_changed_msg in order to remind the user that the specification has been changed and should be stowed.
after_load($spec_name)
If present, the after_load method will be called after a specification has been successfully loaded. The most common use of this method is to support the harvesting of custom code from generated components. Recall that certain models, such as custom, php_class and javascript allow changes to be made to the generated code provided the changes are made within special custom comments. This feature is particularly useful since it allows you to make code changes within the context of a PHP debugger without losing these changes when regenerating the code. Since code changes are made directly within the generated code, this code is temporarily out of sync with the program's specification (stored in XML). The after_load method can be used to bring the code back in sync by harvesting the code stored in the generated program and copying this back into the specification. If this is the purpose of the after_load method you can call an inherited method to handle this synchronization process automatically as shown here:
function after_load($spec_name) {
  return $this->update_custom_code();
}
The update_custom_code method accepts two optional parameters. The first parameter can be used to restrict the custom code harvesting to a specific component (for models that generate several different components). This parameter can be an array to harvest custom code from several components. The values reflect the file name(s) to be checked. The second parameter can be set to true to force a callback to a function called place_custom_code. This can be used to copy the updated custom code to a specific model field. Here we see an example of this used by the javascript model:
function after_load($spec_name) {
  return $this->update_custom_code(false,true);
}
function place_custom_code($key,$sections) {
 if ($key === 'function/execute/{}') {
    $this->javascript = $sections[0];
 }
 return true;
}
Page oriented models which define an after_load method should also call the after_load method of the inherited page_spec class as in:
function after_load($spec_name) {
  parent::after_load();
  $this->convert_dollar_image_to_img();
  return true;
}
before_delete($spec_name)
If present, a model's before_delete method is called just before a specification is deleted in response to the user's delete command. This method can prevent the deletion of a specification by returning false. Return true if the delete operation can proceed. Here is an example of before_delete used by the user model.
function before_delete($spec_name) {
	// If there is a permanent password file for the user, delete this as well
	$folder = $this->site->get_site_path('users',$this->site_directory);
	$password_file = $folder.$spec_name.'.txt';
	if (file_exists($password_file)) {
		unlink($password_file);
	}
	return true;
}
after_stow($spec_name)
If needed, the after_stow method can be used to perform some processing after a specification has been successfully stowed. This method should return true unless there is a problem, otherwise the user will be alerted with an error such as the following:

Here we show how this method is used to clear the cache containing the list of valid dollar functions after stowing the current dollar function.
function after_stow($spec_name) {
  $this->set_remove_cache_file('dollar_cache.inc'); // Force rebuild of dollar function cache
  return true;
}
get_test_code($spec_name)
GenHelm supports a test feature whereby users can enter test in the command line to show a test mode section which renders the output from the current specification. Here we see an example of the Test Mode panel for a certain faq specification.
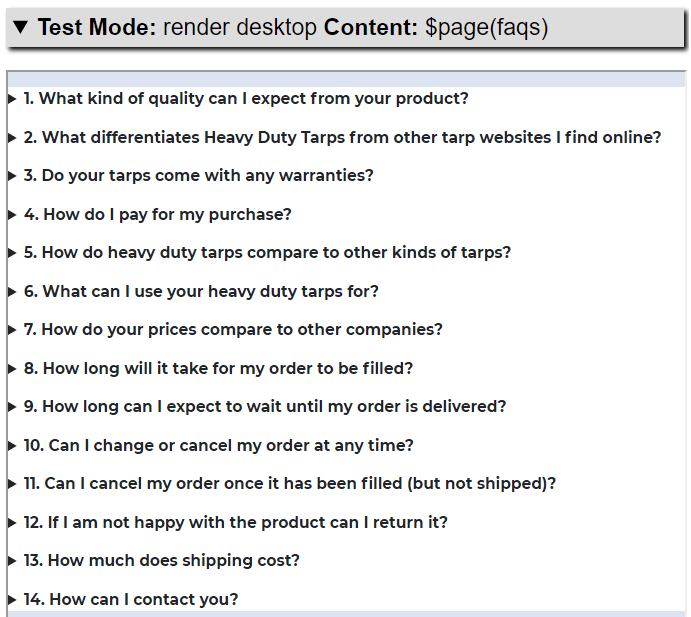
In order for a model to support this test mode feature it needs to implement a method named get_test_mode. Most of the page oriented models implement this method automatically by virtue of inheriting from page_spec. Here we see the code that is implemented by this base class:
function get_test_code($spec_name) {
    $code = '$page('.$spec_name.')';
    return array('width'=>900,'height'=>800,'summary'=>$code,'code'=>$code);
}
This method must return an array with the following four keys defined:
| width | The width to be used for the test panel (in pixels). |
| height | The height to be used for the test panel. |
| summary | The summary text to be shown at the top of the test panel. |
| code | The code required to implement the test. |
Note that the test option shows the results of the specification at the time it was last stowed so users must restow the specification to see any recent changes.
import($parameter_array)
Sometimes models can anticipate ways that specifications can be derived from information that is available from various components. In such cases they can implement an import command that users can issue to improve their productivity. As an example, reports are often created to show data that has been posted on a form, along with standard information such as date, time, IP address, etc. The report model makes it easy to handle this common case by allowing the user to import a form into the report specification. Here we show import code used by the model_report class.
function import($parameter){
if ($parameter[0] !== 'form') {
	$this->assign_message('report',2010,$parameter[0],'Invalid import type :1:, must be form.',
                          __LINE__.' '.__CLASS__);
	return false;
}
// Make sure the referenced form exists
$obj_type = $parameter[0];
$formname = $parameter[1];
$directory = $this->site->get_site_path('includes',$this->site_directory).'page/';
$inc_file = $formname.'.inc';
$file = $directory.$inc_file;
if (!file_exists($file)) {
	$this->assign_message('translation',2002,array($obj_type,$inc_file,$directory),
                          'Import :1: :2: was not found in :3:',__LINE__.' '.__CLASS__);
	return false;
}
// Set boilerplate report columns
$report = array('Date' => '$date(,,yyyy-mm-dd)' , 'Time' => '$time(,,12:mm ap)',
                'IP' => '$server(REMOTE_ADDR)', 'Geo Location' => '$geoloc()');
// Read the form .inc file and look for field names (starting with :)
$rows = file($file);
$count = 0;
foreach ($rows as $row) {
	$pos = strpos($row,',CODE,\':');
	if ($pos !== false) {
		$rest = substr($row,$pos + 8);
		if (substr($rest,0,1) === ':') {
			continue;
		}
		$pos = strpos($rest,'/'); // First look for slash following the field
		if ($pos === false) {
			$pos = strpos($rest,'\'');    // If not found look for '
		}
		$field_name = substr($rest,0,$pos);
		if ($field_name === 'submit') {
			continue;
		}
		$heading = ucwords(str_replace('_',' ',$field_name));
		$report[ucwords($heading)] = '$post('.$field_name.')';
		$count++;
	}
}
if ($count !== 0) {
	$this->add_rows($report);
	return true;
}
else {
	$this->assign_message('translation',2005,false,'No fields were found to import (seeking :field_value)',
                          __LINE__.' '.__CLASS__);
	return false;
}
}
By default, the import command assumes one parameter. If your model needs more parameters you must also supply a second method named import_parameter_requirements to indicate the minimum and maximum number of parameters supported. Here we see an example of this used by the report model:
function import_parameter_requirements() {
    return array('min' => 2, 'max' => 2);
}
Technically, the report model only needs one parameter, which is the name of the form being implemented. Nevertheless, this has been implemented to require two parameters so that the user must enter the import command as "import form formname". This notation has been chosen in case the report model introduces new import options in the future.
sort($parameter)
Models can optionally support a sort command by implementing a sort method. This function takes one parameter which indicates the field by which to sort. The sort implementation will vary based on the data used by the model. Here is an example of a sort method used by the glossary model. This uses a base class to sort a flexgrid by a supplied field name.
function sort($parameter) {
    if ($this->sort_spec_array('glossary_terms','term')) {
        $this->assign_message('spec',2085,false,'Sort command completed successfully.',__LINE__.' '.__CLASS__);
    }
}
clear_spec_details()
This method illustrates a GenHelm feature wherein methods can be supplemented or replaced by custom code. The GenHelm model model automatically generates a method named clear_spec_details. This method is called if the user explicitly uses the clear command and also when the model is loaded for the first time. By default, this model initializes all of the properties of the model to their default "empty" value (this is either a supplied initial value or zero for numeric fields and an empty string for character fields). Usually, the default handling is sufficient and no custom code is necessary. Occasionally you may develop a model wherein you want to replace or supplement this default method code. Here we show an example where the default code has been replaced with custom code:

By changing the Location option you could also choose to supplement the default code by adding your own code either before or after the standard clear code.
The other interesting thing to note about this code is that it uses the inherited method scalar_field_definitions. This returns the collection of fields used by the current model. Using this lets us clear all the fields without naming each field individually. This makes the code more nimble since this code won't need to be updated if new fields are added.
You may be wondering "how does one incorporate required or "supplementable" functions into the custom code of a model?". For help on this topic please click supporting custom code.
Custom Commands
So far, many of the optional methods we have described are used to support commands that users can enter on the GenHelm command line. These include:
- change
- import
- sort
- test
Models only need to implement these commands when it makes sense to do so. For example, if "sort" does not make sense within the context of a certain model, the optional sort method should not be implemented.
It is also possible for models to implement custom commands. These can either be implemented as command line commands or as buttons. Let's review these options next.
Custom Command Line Commands
To implement a new command that users can enter into the GenHem command line you must code a supporting method in your model named custom_command_name, where name is the custom command to be implemented. This method can accept up to two parameters:
- The first parameter is the name of the current specification (or null if a specification has not been saved)
- The second parameter is an array of strings that contain the command parameters entered by the user. This will be false when no parameters are passed.
For example, if the user enters the command "a b c d" while editing the specification named spec1, GenHelm would check to see whether the current model implements a method named custom_command_a. If it implements this method it will be called passing 'spec1' as parameter 1 and array('b','c','d') as parameter 2.
Let's look at a real example of a custom command implemented by the image model. This model supports a custom command named scratch. This command is used to delete an image definition along with all of the images referenced by the definition. The normal delete command, supported by all models, deletes the specification as well as any components generated by the model but it does not delete "related" components. Therefore, using the delete command for image definitions will delete the image specification and the generated .inc definition but it won't delete the actual image files referenced by the definition. The custom scratch command can be used for this purpose. Here we show the code for the scratch command.
function custom_command_scratch($parm1,$parm2) {
// Sanity check the context and the parameters
if (empty($parm1)) {
	$this->assign_message('spec',2096,'scratch','Command :1: only applies after a specification has been loaded.',
                          __LINE__.' '.__CLASS__);
	return false;
}
if (!empty($parm2)) {
	$this->assign_message('spec',2095,array('scratch',0,sizeof($parm2),''),
                          'Command :1: expects :2: parameters but :3: parameters were passed :4:',
                          __LINE__.' '.__CLASS__);
	return false;
}
$images = $this->get_all_image_names();
if ($images === false) {
	$this->assign_message('image',2311,false,'The current specification does not have any referenced images.'
                          ,__LINE__.' '.__CLASS__);
}
else {
	$image_folder = $this->site->get_site_path('images',$this->site_directory);
	foreach ($images as $size => $name) {
		if ($size === 'orig') {
			$image_folder = $this->site->get_site_path('original-images',$this->site_directory);
		}
		$image_name = $image_folder.$name;
		if (file_exists($image_name)) {
			if (unlink($image_name)) {
				$this->assign_message('image',2310,array($size,$name),':1: image :2: was successfully deleted.'
                                      ,__LINE__.' '.__CLASS__);
				$method = 'set_file_name_'.$size;
        		$this->$method('');
				$method = 'set_width_'.$size;
        		$this->$method('');
				$method = 'set_height_'.$size;
        		$this->$method('');
				$method = 'set_size_'.$size;
        		$this->$method('');
			}
			else {
				$this->assign_message('image',2313,$image_name,'Deletion of image :1: failed.',
                                      __LINE__.' '.__CLASS__);
			}
		}
		else {
			$this->assign_message('image',2312,array($size,$name),'Could not find referenced :1: image ":2:".',
                                  __LINE__.' '.__CLASS__);
		}
	}
	$this->self_destruct();
	$this->set_spec_altered();
}
}
 function get_all_image_names(){
 	$image_folder = $this->site->get_site_path('images',$this->site_directory);
 	$sizes = $this->get_sizes();
	$sizes['orig'] = true;
    foreach ($sizes as $size => $true) {
        $method = 'get_file_name_'.$size;
        $image_name = $this->$method();
		if (!empty($image_name)) {
			$image_list[$size] = $image_name;
		}
    }
    return isset($image_list) ? $image_list : false;
}
Since the scratch command only applies when the user is editing a saved specification we begin by making sure we have a specification name in parameter 1. We also make sure the user has not passed any parameters to the scratch command, since it does not support any parameters.
The code then goes through all of the linked image files and deletes these if they exist. In addition to deleting the related images, this code also calls the self_destruct method of the base class to inherit the normal delete behavior.
Custom Button Commands
There are two approaches by which models can support custom buttons:
- Form handler classes can implement buttons that are handled directly (without calling the model object).
- Command buttons can be implemented within the model class.
The second option should be used if the command can be handled independently of the model's form. For example, it is possible to instantiate and call model objects programmatically outside of the context of the model's main form. If the command you are implementing might be needed in this context it is best to implement the command handler method directly within the model class.
Implementing Buttons Within a Form Handler
The process of handling buttons from within a form_handler class is similar to the way buttons are handled by any form. That is:
- Add a button to the form.
- Define a custom form handler for the model form.
- Add a function to the form_hander to process the button.
As an example we will temporarily add a form handler and button to the anchor model form e_anchor as shown here:
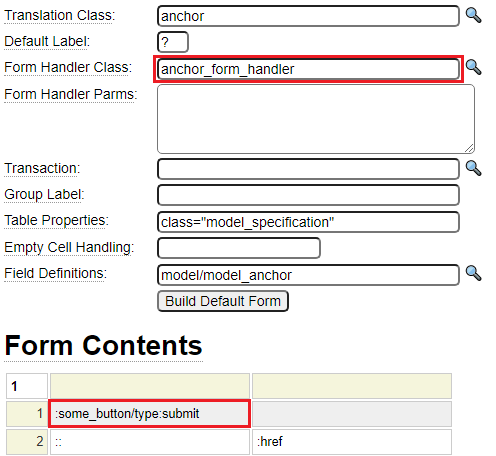
The button handler is implemented as a function within the form_handler class. Here is a trivial example of such a function:

Obviously this button handler does not do anything except write a value to the form's debug area. Since this method returns false, processing will not continue to call the model_anchor class. If this function returns true, it would be necessary to have a method named some_button in the anchor model class to handle this command.
Here we can see the anchor form after pressing "some_button":
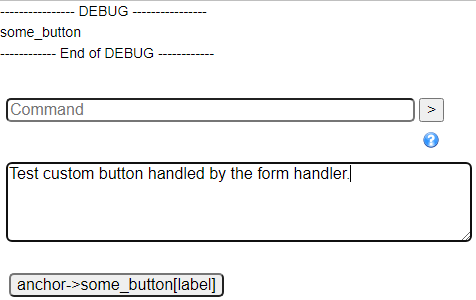
Notice that, by default, the label for the button also needs to be added to the anchor translation object. Alternatively, you could add a property *label:Some Label to the button.
Implementing Button Commands Within the Model Class
The second approach to implementing button commands is to add a method to the model class whose name matches the button. With this option there is no need to implement a custom form_handler. The method in the model class will be passed the name of the current specification in parameter 1. Here we see an example of how some_button could be implemented within the anchor model class:
function some_button($spec_name) {
  $scalars = $this->scalar_field_definitions();
  foreach ($scalars as $field => $info) {
	$this->site->debug($field,'=',$this->$field);
  }
}
Pressing this button would simply write the current specification parameters to the debug area as shown here:
---------------- DEBUG ----------------
href = {empty string}
document = tarp-specification.pdf
link_text = revised drawing
title = Revised drawing created by Heavy Duty Tarps
------------ End of DEBUG ------------
Finishing Off Your Model
So far we have described all of the key components needed to implement a model, in the final section we will describe how you can add help for the model.
