Before you can create a new live site it is necessary to perform a few preliminary steps within the live site environment.
Publishing Your First Site
If the live server has not yet been configured to publish any sites, this must be done before you can publish your first site. To do so, please follow this link:
Setting up a new production server.
If your production server already hosts sites that are linked to the current sandbox, you can skip this step.
Publishing a New Site
These steps need to be followed each time you add a new GenHelm site to your production server.
Defining the Add-on Domain or Dedicated Account
If this is the first promotion of the site you will need to define an add-on domain that matches the site-directory used to define the site.

In cPanel the default Document Root folder includes the top level domain (such as .com). Remove this so that the subdomain and the document root folder are the same.
Copy index.php
When the add-on domain is defined, cPanel automatically creates the document root folder. Using your favorite FTP client or cPanel's File Manager, navigate to the public root folder associated with your new site and copy a file name index.php into this folder. The contents of this file should be as follows:
<?php
require '../../webstart.php';
?>
Adjust and Copy _site_settings.php and Define a Production User
Back in the sandbox in the GenHelm environment logon to the site you wish to publish for the first time and execute the commend e site_settings.
Adjust Live Site Domain if Necessary
Make note of the Live Site Domain setting. If the site you are promoting is already live in another environment you must take precautions to allow you to set up the site on your production server without disturbing the current production site. In other words, if you are migrating an existing site you will want to follow these steps:
- Build the new site on your production server.
- Test the site on your production server.
- Point the domain to your production server at the time when you want to go live.
Following the steps in the above order will eliminate the risk of having any down time since you won't re-point the domain until your site is working. On the other hand, if this site is brand new (the domain is not being used by an existing site), you can perform step 3 first since there won't be any current traffic to the site.
If the domain is already live and pointing to another server, the way you access the preliminary site is through a subdomain. In other words, rather than using a live site domain such as www.somesite.com you will use something like somesite.wtscdn.com where somesite is the name of your add-on domain and wtscdn.com is your framework domain. If necessary (that is you are not ready to point the domain to your production server), change the name of the live site domain in site_settings to the correct subdomain and stow site_settings (in the sandbox environment).
Copy the site_settings.php to Production
If you have access to your sandbox server, you can copy your _site_settings.php class directly from the private_data classes folder on your sandbox to your production server. If you don't have local or FTP access to your sandbox your can obtain the code to be copies by following this procedure. Within GenHelm use the command e site_settings to load the site_settings specification. Click on the classes/_site_settings.php link to the right of the generates prompt in order to open a new browser tab showing the source for this class. Select the contents of the code (without the line numbers) and copy this to the clipboard.
Next open up notepad or some other editor and paste the contents of the clipboard into the file. Next save the file under the name _site_settings.php.
Using an FTP client or cPanel's File Manager perform the following steps:
- Create a subdirectory under the private_data folder of your production server using the name of your site (the same site directory you used in the sandbox).
- Under this folder create a subfolder called classes.
- Upload _site_settings.php into the classes folder.
Assuming your site directory is named exemptmarketdealers, when you are finished your folders should look something like this:

Note that the .well-known folder is related to ssl/tls keys and is outside the scope of this discussion.
Defining a Production User
Code promotions into the production environment must be performed by a user who can log into production. Users who are defined within the system pseudo site are permitted to log into any site on the server. If a system user is defined, he or she could be designated to perform the first promotion of the site. If no such user exists, it is necessary to create the first user, either within the site to be promoted or within system if you want the user to promote any site.
Assuming you wish to define the user to the current site only, within the sandbox use the user model to define and stow a user who will be allowed to complete the promotion. This user must be assigned the Role of promoter within the site-admin Group by entering these values at the bottom of the user specification as shown here:

After the stow command has been issued make note of the message next to the Temporary Password field. This will tell you the password that will be used to log into production for the very first time.

Follow a procedure similar to what was done to copy the user definition to the production server. In this case you will be copying the file from the private_data includes/user folder. The filename will be the userid.inc as shown here:

Since the includes/user folder won't yet exist on your production server it will be necessary to create this folder and subfolder before you can copy the user definition.
Test Your Shell Site
At this point, you should already be able to test that you have connectivity to your site. If you have not yet pointed the domain to your server you can test your site using the subdomain. Here we see the sysadmin/hello-world page accessed using a subdomain:

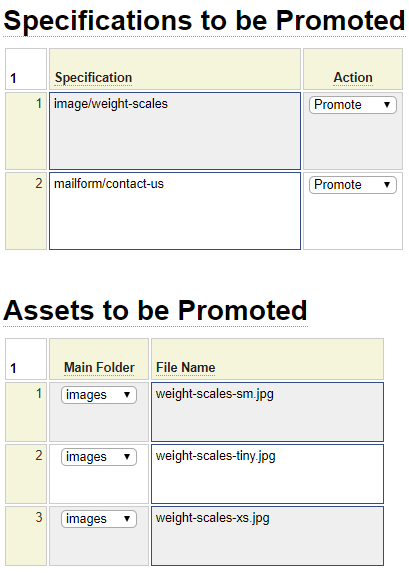
Now you should be able to promote changes to your site using the promotion model. Refer back to the help related to the promotion model. Note that, since most of the required folders are not yet defined within your production site, you will receive warnings similar to the following when you use the compare features of the promotion model for the first time:

If you have not yet pointed your domain to your server you will need to do this after you have tested your site while accessing it via a subdomain. Note that it may take a few hours for your DNS changes to propagate across the web.
If you set up a new user for this site, he or she will be required to enter the temporary password and change their password when they log into the production server for the first time.