The simple_bloglist model is used to present a list of blog posts to allow the user to select a blog post that they may be interested in.
The framework supports two independent blog implementations:
- A database driven set of blogs.
- Simple blogs that do not require a database.
This help deals with the second option (simple blogs). Here is a summary of the key differences between the two options.
| Simple Blog | Database Blog | |
|---|---|---|
| Any page-oriented model can be used to define the pages of a simple blog. | The database blog pages are all based on the WYSIWYG editor. | |
| Any number of independent blogs can be created. Each blog is defined by a blog id and can contain any number of posts. | Any number of independent blogs can be created. Each blog is defined by a topic id. Each blog topic can include any number of posts. | |
| Simple blogs do not support categories. | A list of categories can be defined for each blog (topic). Each post can be associated with any number of categories. | |
| Lists of posts (within a blog) are defined using the simple_bloglist model. If there are more posts than are shown on a page, pagination links can be added to navigate to any list page. | A short list of posts can be generated using the latest_blog_posts model. Standard (system) pages are available to list categories and posts. | |
| Posts must be defined in the sandbox and promoted to production. | Posts are normally defined directly within the production environment. This allows end users to maintain the blog without assistance from technical staff. |
If you are looking for help related to database blogs. Please visit blogs stored in a database.
Creating a Simple Blog
Any page can be added to a simple blog just by designating its Page Type as "Simple Blog Page"

In addition to such a designation, it is necessary to provide some descriptive information about the blog post. This is done using the Simple Blog Properties found in the Advanced Page Properties section.

Sites can have any number of blog (lists) with each blog consisting of any number of posts. For example, your site could have a blog called "policies" which might contain posts such as "payment-policy", "return-policy", "privacy-policy", etc. This same site could have another simple blog called "testimonials". The "posts" in this blog would be reviews or testimonials sent in by your customers.
Most sites will likely have only one simple blog. In such a case it is not necessary to provide a Blog Identifier and this will default to "blog".
The Post Date is used to sort your blog posts. These are sorted with the most recent posts showing first. Note that it is not necessary to show this date as part of your blog list. Nevertheless, the Post Date is still necessary for sorting purposes. It is also possible to post-date your post. For example, if you don't want a post to appear in your blog list until a certain date. Enter the future date in the Post Date field and the blog will not appear in the list until this date is reached.
Author can be used to show the author of the posts in the blog list.
In addition to the Simple Blog Properties, several of the Most Used Properties are also required for simple blog posts.

Defining a Blog List
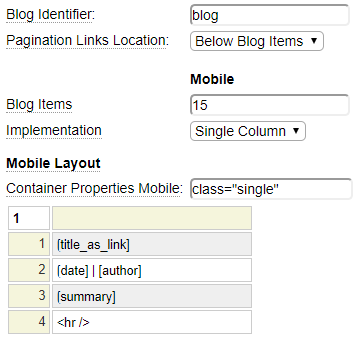
The Blog Identifier is necessary to define a blog list. If your site only has one blog (that uses the default name) enter "blog" as the Blog Identifier. Otherwise, enter the name of the blog whose posts are to be listed.

If you are not showing all available posts in your list, you will want to add links which will allow the user to navigate to page 2 and subsequent pages of the list. Indicate where you would like to show these links.
Laying Out the Blog List Entries
Generally speaking, you should strive to achieve fully responsive pages where possible. Nevertheless, there are times when you want to take advantage of wider desktop screens without the burden of responsively adapting your page to narrow devices. For this reason, this model allows you to define two separate blog list layouts:
- One for mobile devices
- Another layout for desktop devices
If you want to keep your design fully responsive, simply ignore the desktop layout settings. In such a case, the mobile settings will be used even when running within a desktop browser.
Here we see an example of an adaptive design.

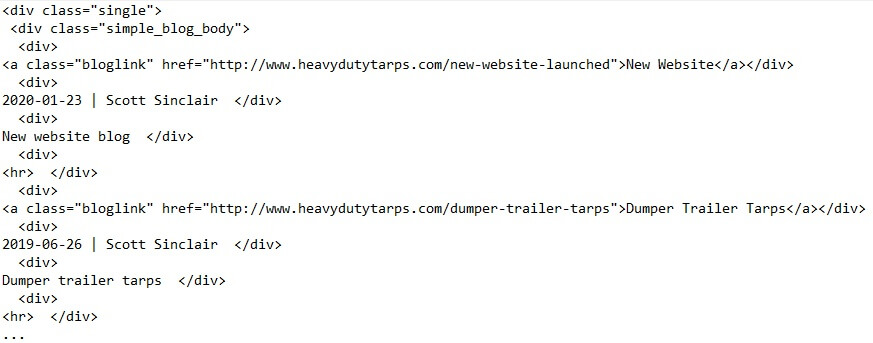
Since this specification indicates a different layout for mobile and desktop devices the result will be an adaptive design. On mobile devices, the blog list will be rendered as shown here:

One desktop devices, this same list will be rendered as follows:

Blog Items
Even in situations where you have different mobile and desktop layouts, we recommend that you keep the number of blog items the same. This is because the item size setting affects the indexing/content of your page. In other words, if search engines emulate a mobile device when indexing your page, this can affect pagination and the number of pages that are indexed. This should be consistent across all devices. If you leave the Desktop Blog Items field empty, this will automatically default to the Mobile item number.
Implementation
Implementation can be one of the following values:
HTML Table | In this implementation, the blog list values will be presented as an HTML table. The columns of the grid correspond to the columns of the generated HTML table. The rows of the grid reflect what will be shown for each blog list row. You can use <ctrl>+spacebar on any cell to add cell properties. For example, if the above desktop implementation was using an HTML Table implementation, you would most likely want to add colspan="4" on the cell containing the hr tag so that it spans all four columns. |
Bootstrap Grid | This is similar to an HTML Table except the list will be implemented using divs and bootstrap classes. In this example, we have added a property to column 4 (the desktop Summary column). We added property class="col-5" so that the Summary column is wider than the other columns. This column property is applied to all rows. |
Single Column | With this layout, the blog list entries will be simply stacked onto different rows using a series of div tags. |
Container Properties
Depending on the implementation chosen, there will be an outer container that encompasses all of the blog list rows. When the implementation is an HTML Table, the container will be the table tag. Otherwise, the container will be a div tag. In each case it is possible to supply one or more properties of the container.
Layout Grid
The layout grid determines what one row of the blog list page will look like when it is rendered (on the corresponding device). The grid can contain any text or html you wish. You can also set row, column or cell properties just as you would when using the table model or the bootgrid model. In addition to normal text, the grid can contain special placeholders to represent information from the blog posts. These special placeholders are described below:
| Placeholder | Description |
| [date] | The publish date of the post |
[author] | The author of the post |
[summary] | The summary description of the post. Note for simple blog pages, the summary comes from the descriptive text associated with the page specification. |
[summary_as_link] | The summary as an anchor to link to the post |
[title] | The title of the post |
[title_as_link] | The title as an anchor to link to the post |
[shortlink] | The short link value as an anchor to link to the post |
| [longlink] | The long link value as an anchor to link to the post |
Handling Multi-Page Blog Lists
If there are more blog posts than will fit on one page, the page will render navigation links to allow the user to see the second page of blog post links, followed by the third page, etc. It is possible to alter the title, header and meta description for the various pages by using special placeholders which reflect the current page number and the total number of pages.
:page: will be transformed into the current page number
:pages: will be transformed into the total number of pages
Consider the following Page Properties:

Notice that the title contains a dollar function. This "if" statement says "If the current page is greater than one, add page x of y to the title". Using this logic, the first page of the blog will have a title of "Tarp Blog". Assuming there are 3 pages of blog list entries, page 2 will have the title "Tarp Blog page 2 of 3".
Navigating Between Blogs
The $function $simple_blog_next_link can be used to add links at the bottom of your blog pages to allow the user to easily navigate to the previous and next pages of the blog. This function should normally be called from the footer of your layout so that it applies to all blogs. In most cases you likely won't need to pass any parameters to this function. By default, the current page from the URL is assumed to be the current page of the blog, if this is not the case you will need to pass a parameter which is the name of the current blog page.
By default, the contents returned will be a table showing the previous and next links. Normally you will want to add styling similar to the following:
.blog_prev_next {width:100%;}
.blog_next {text-align:right;}
If you want to perform your own formatting, you can pass in a second parameter to the $simple_blog_next_link function. Pass "prev" or "next" to just obtain the raw links. In this case, two calls will be necessary to get both links.