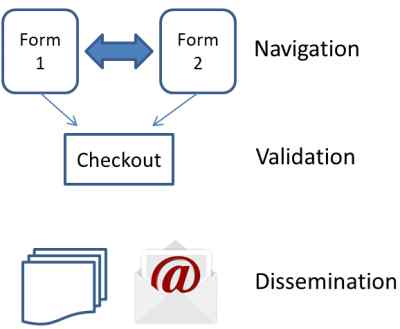
The transaction model defines behaviour to be applied to forms. There are three main reasons you might want to link a transaction to a form:
- To facilitate automatic left-right scrolling across a series of related forms.
- To support the automatic syncing of form fields with session variables to allow form content to be preserved.
- To automatically email or save the contents of a submitted form or series of forms.
- To perform some process, only after the user has completed a series of forms.
If a transaction has been linked to a form or series of forms, when the user submits the last form in the series the transaction processing will be triggered automatically.
Multi-Form Scrolling
If you need to collect a lot of information from the user, it is often best to divide this over a series of screens so that the user is not overwhelmed by seeing a plethora of fields on one page. When multiple forms are involved in a transaction, the system uses session data to store the information on each form. When the user returns to a form they previously interacted with, the fields on the form are automatically initialized to the values that were last entered. To activate this feature you must select the following transaction option which tells the form page to synchronize the form fields with like named session variables:

Let's suppose we want to use three forms to collect some information for a transaction. We would create each of these separately using the form model then we would list them as part of the transaction as illustrated below:
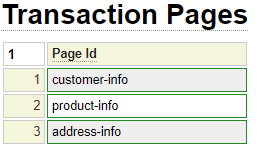
The first form listed should be the first one shown to the user. When the user clicks the "next" button they would be shown the second form and so on. When the user submits the last form in the series, the transaction "checkout" processing takes place.
Referencing the Transaction Object (First Form in the Transaction)
The transaction name must be referenced on the first form involved in the transaction. Consider the following page definition:

There are two important settings that must be applied on the first form of a transaction.
- The transaction name must be assigned (in the example the transaction name is order).
- The page type must be set to Transaction Start
Navigating Transaction Forms
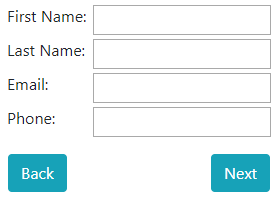
If this is a multi-page transaction you will also need a button to allow the user to navigate to the next page of the transaction. In the screen capture above, you can see that the form references another form called transaction_prev_next. This form contains a button called transaction_next that tells the form handler to navigate to the next page. On the final page of a transaction you may use a button called transaction_last instead of transaction_next. The form also includes a button named transaction_previous which is used to navigate back to the previous page.
Here we can see what the rendered form looks like:
Remaining Forms of the Transactions
All of the forms involved in the transaction must have a special page type. We have seen that the first form must be assigned Page Type Transaction Start. The remaining forms must be assigned a page type of Transaction Next. With such a designation, users will not be allowed to navigate directly to the page.
Using the Default Navigation Buttons
Consider the following form definition that is available within system under the name form_nav.

This form subsection is used to render the buttons for a multi-form transaction similar to what we see here:

When building common components such as this into the framework it is important to make these components as flexible as possible. For example, what if you wanted buttons like this but you don't want them to be red? What if you don't want to show the "breadcrumb" information on the form?
It would be possible to create several standard nav button forms, each with different button colors, but this would get unwieldy. Instead, this form was created to allow certain options to be configured at runtime. Let's review how this was done.
Configuring the Button Colors
Notice that the *based-on parameter includes a dollar function reference. This allows the color of the button to be set dynamically just by changing the *based-on value on-the-fly.
*based-on:button/back-$get_config(model,form,nav_button_color,blue) will use the following config value to determine the button color to be used:

As with all config settings, this setting can be overridden at the page level if desired. The following color options are currently available:
- black
- blue
- cadet
- lightgrey
- darkgrey
- green
- red
- sky (light blue)
Additional colors can be added by defining button images named button/next-[color] and button/back-[color] as well as html_field_types of the same name.
Next consider the cell between the two buttons:
$if_parm(bread,y,'$if_mobile(,$transguide())')
This is using several nested dollar functions to determine whether to render the breadcrumb links. Let's break this down. On the outside there is a $if_parm function. This is used to test the value of the bread parameter and, if it is "y", it includes the next parameter. We want to override this setting on mobile devices since these generally would not have enough screen space to show the breadcrumbs. That's why we use the $if_mobile setting.
Here we see how this nav_form can be included in another page while passing the bread parameter to the page. This particular form definition shows the contents of the session variable $_SESSION['message'] in row 1. Next it shows three subform to show contact information. Finally, it includes the form_nav subform passing in the bread parameter.

Emailing Form Contents
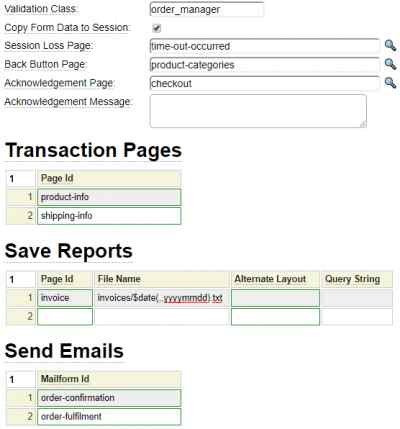
If you want to email the contents of the form(s) being submitted at the completion of a transaction you will use the following transaction fields:
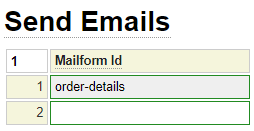
For details of setting up mailforms please refer to help associated with the mailform model.
Saving Reports
Reports can be generated using any page-oriented model but in most cases you will want to use the report model which is designed to save data in tab-delimited format. If there are multiple forms involved in the transaction you will want to write session values to the report using $session. If there is only one form used by the transaction you can write the report using the $post function to write the values posted on the form. Here is a sample report setting:

Reports are saved within the site's private_data data folder. The file name you specify will be relative to this folder. In the example above we have indicated that the report should be saved in the order subfolder. We use the $date function to include the current date as part of the file name. Orders on any given day will be appended to the report for that day.
Post Transaction Processing
Usually, after completing a transaction, you will want to make the user aware that the system has processed their input. In most cases you will redirect to some sort of confirmation page that summarises what they have done. At a minimum you will want to give the user some sort of completion message. Using the following transaction settings we are instructing the system to redirect to a page called confirmation and show the specified message upon completion of the transaction.

Custom Transaction Processing
The transaction object allows you to specify the name of a Validation Class that can be used to handle custom validations and/or specialised checkout handing. This class should normally be generated using the php_class model and defined as a subclass of the system class transaction_validation_base. This inherits from standard_base so that full message capabilities are supported.
Transaction validation classes are similar to form validation classes and in many instances either one could be used. The main difference is that form validators tend to be form specific whereas transaction validators often deal with validation and checkout processing that spans multiple forms.
The transaction validation classes have access to the field_list property to obtain field values for the current form but they may also need to access session variables to obtain values for fields located on previous forms. This class can define the following methods:
initialize_session
If your transaction has enabled session support, this method can be used to perform session initialization or other activities to be performed once at the start of the transaction.
transaction_start
This will be called just after initialize_session at the start of a new transaction. Unlike the initialize_session method, this method may be called more that once per transaction in situations where the user returns to the starting page associated with the transaction.
pre_validate
If present, this method will be called when the user presses the transaction_next button to proceed to the next page of the transaction. Return true if you want to proceed and false to terminate further processing. Normally you should call the validator's assign_message method to set a message before returning a false condition.
pageid
If you have written a method that matches the current page id, this will be called when the user has pressed the transaction_next button to proceed to the next page of the transaction provided there is no pre_validate method or if the pre_validate method returned true. This method should return true to allow the user to proceed to the next page. If false is returned, be sure to have called the assign_message method to inform the user as to why they can't proceed to the next page. This method will not be called for the final page of the transaction (see final_checkout_processing for the processing that occurs on the last page).
Note that some pageids may not be legal for use as method names. In such cases replace any dashes in the page name to single underscores and replace any slashes to double underscores. For example, page order/custom-jewellery would become method order__custom_jewellery.
final_checkout_processing
On the last page of a transaction, when the user clicks the transaction_next (or transaction_last) button, this method will be called, if defined. Perform any final validation at this point and if there are validation errors call assign_message to set a suitable message and return false to prevent the user from leaving this form. Otherwise perform any final processing associated with the transaction such as committing the transaction to a database and return true to proceed to the post completion (Acknowledgement) page.