The wysiwyg model is used to quickly create web pages visually. wysiwyg stands for "What You See Is What You Get", however, this declaration needs to be taken somewhat loosely because the styling used during the editing process may not match what is in place on the resulting web page when it is rendered in the context of the target site. The process of creating a web page using the wysiwyg model basically involves adding text and images to the edit area and styling these using the various toolbar options.
Emulation Site Styling
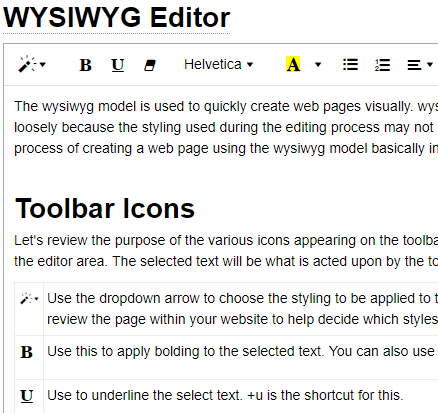
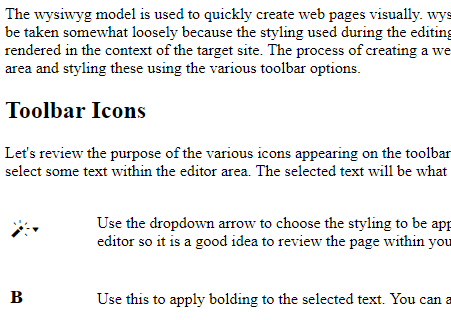
One of the pitfalls of wysiwyg editors is that styling generally happens behind the scenes and users may not even be aware of style settings that are being applied. This can lead to documents that are not consistently styled or that contain unintended styles. To help overcome this problem the default styles that are in place when using the wysiwyg editor intentionally show important style settings to alert the user as to what styles have been applied. The following image shows the various embellishments that may be applied:

Notice that all heading tags are preceded by small text showing the heading level. Code samples (pre tags) are surrounded by « and » symbols and quotes are surrounded by quote characters. div tags and font tags are encased in red lettering showing that these tags have been used since these tags are often introduced in error so you will generally want to clear these tags by converting the content to normal text.
If you don't want this behavior there are two ways that you can change this:
- Change the default styling for all sites that you edit.
- Override the default editor styling on a site-by-site basis.
Keep in mind that the changes described here have no effect on the styling used in the sites you build. If you want to change the default editor styling for all sites perform the following steps:
| Direct Command | Action |
| logon system | Logon to the system pseudo site |
| new styles | Invoke the styles model to create a new stylesheet |
| example wysiwyg‑editor | Load an example stylesheet for use by the wysiwyg editor |
| At this point you would make any changes to the stylesheet that you wish. For example, if you don't want to show the heading levels you could delete the rows with the ::before styling | |
| stow wysiwyg-editor | Stow a new stylesheet named wysiwyg-editor within the system pseudo site. |
During the wysiwyg editing process, we ideally want to emulate the styles that will be used on your website when the page is rendered. Therefore, if you want to make the editor styles consistent with those that will be used by your website you should first finalize your website stylesheet then you can apply these styles to the wysiwyg-editor styles. The procedure for creating site-specific editor styles is similar to what is described above except that you won't logon to system but rather you will logon to the site whose styles you want to override. In other words, the wysiwyg model looks for the wysiwyg-editor.css in the current site first and if it does not find this it looks in system and if neither are defined it used the system styles named default-wysiwyg-editor.css.
Additionally, you can define styles that are specific to certain layouts. To do this, name the stylesheet wysiwyg-editor-layout-name.css. For example, if your page overrides the default layout and uses a layout named back-office, the system will attempt to load the stylesheet your-site/styles/wysiwyg-editor-back-office.css to style your web page during the editing process. Note that these styles are not generally used on the live site except in cases where the live site supports wysiwyg editing.
Dollar Function Help
The wysiwyg model supports all dollar functions. Like most other models, the wysiwyg model supports the feature by which dollar function help can be launched by entering the dollar function into the specification and placing your cursor within the dollar function name and using <ctrl>+g to launch the help. Using this method will allow you to generate the dollar function and accept the completed function code to be inserted into the editor. An alternate method is to use the gadget shown here to obtain help for the desired dollar functions.

When using this method, to transfer the dollar function you must use your browser's copy/paste feature. You can either copy the dollar function text while you are inside the popup help or you can click the Accept button on the help form. This will transfer the completed dollar function back to the editor form to the right of the $function Help button. You can copy this text to the clipboard and paste it into the desired location inside the wysiwyg editor.
Toolbar Icons
Let's review the purpose of the icons appearing on the editor's toolbar. In most cases, the way you interact with the toolbar is to first use your mouse to select some text within the editor area. The selected text will be what is acted upon by the toolbar.
| Use the dropdown arrow to choose the styling to be applied to the selected text. The precise styling may differ from what you see in this editor so it is a good idea to review the page within your website to help decide which styles you want to use. |
| Use this to apply bolding to the selected text. You can also use <ctrl>+b for this purpose. |
| Use to underline the selected text. <ctrl>+u is the shortcut for this. |
| Removes any styling from the selected text. |
| Use the dropdown arrow to select the font to be used for the selected text. Generally speaking it is unwise to set the fonts using this method. Fonts should normally be set at the site level using a common stylesheet. |
| Use the dropdown arrow to set the text color or background color of the selected text. |
| Used to insert a bulleted list. To insert a list add several lines to the editor by pressing the Enter key after each line. Select all of the lines to be included in the list then click the unordered list icon. It works best if you don't select the entire last line to be included. Doing so may result in an extra line being added to the list. You can avoid this problem by including just a portion of the last line in your selection when clicking the List icon. |
| Used to insert a numbered list. Follow the list insertion instructions above. |
| Used to change the alignment of the current paragraph to one of the following: Left Align, Right Align, Justify (fill the paragraph with spacing so that all lines are the same length), Indent, Remove Indentation. |
| Used to insert an html table. Click the dropdown then drag the cursor to select the number of rows and columns to be inserted in the table. At this time if you need more rows or columns than can be selected it is necessary to add additional cells using code view mode (see below). This is also how you must insert and delete table rows. |
| Use this to insert a link to a page. If you are linking to an external site, enter the full url starting with http. If you are linking to a page within the current site, start with the url portion after the domain name. For example, some-page. |
| Used to insert and configure images. See details regarding image handling below. |
| Used to insert a video control. Enter the URL of the video to be played. To insert locally defined videos consider using the $video function. |
| This changes the editor to full-screen mode. Click it again to go back to normal mode. |
| As you are interact with the editor, behind the scenes, html tags are being created. It is actually this html that is used to render your page. Sometimes you may need to create html that is beyond the capabilities of the normal editing features. Experienced users can go into html view mode and alter the html by adding any valid html tags. For example, if you are unable to add enough rows or columns to a table, it may be necessary to add additional rows or columns in raw html. This procedure is described in detail below. |
| This help button provides a quick overview of the shortcut keys available within the editor. For example, you may notice that there is no icon to apply italics to text. Looking at the help you can see that this can be done easily using the shortcut <ctrl> |

Image Handling
Inserting Images
There are three main ways that images can be inserted:
- If you have an image on the clipboard it can be pasted into the editor at the cursor location by right-clicking and choosing Paste or using <ctrl>+v. The Windows Snipping Tool is an easy way to select an image and copy it to the clipboard. You could also do this using an image editing tool such as Paint.
- You can insert an image by selecting the image option from the toolbar and either uploading an image or entering an image url.
- You can drag an image from another location.
Depending on the method you choose, the image reference (src attribute) may be a URL that points to a website to obtain the image or it might be an "inline" image.
Determining the Source of the Image
To determine this you can click on the image and select the pencil from the popup toolbar as shown below:
![]()
We can see in this example that the source tag starts with data:image/...:
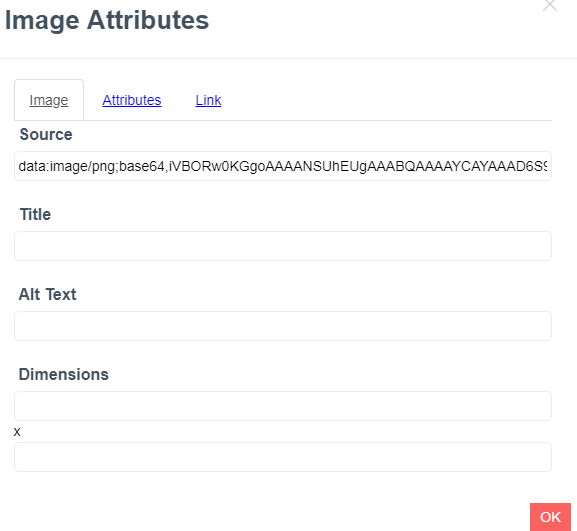
This means that the image is inline, That is, rather than pointing to an image on your web server, the entire image data is stored within the page itself. Generally speaking, you want to avoid defining images this way because it does not allow your browser to cache the image so that it is loaded faster if the same user returns to your webpage. Inline images also are not as beneficial from the standpoint of Search Engine Optimisation (SEO). You should usually only keep "data" images in cases where the image is relatively small and if it is not important to SEO.
Another possibility is that the Source property points to a 3rd party website. It is generally considered bad practice and poor etiquette to point at images on other websites because you are using the resources on these websites to serve up the images to the browser. Also, you never know when a website will delete or change one of its images. In most cases you should only point at images that reside on your own website.
Title and Alt Text
Make note that the image definition above also contains a Title attribute. It is a good idea to give each image a short description. By default, this title will also be used for the required Alt Text so you can leave this empty if you want to make the Title and Alt Text the same.
Converting Data to Saved Images
Fortunately, the wysiwyg editor has a built-in feature which can be used to convert all of your data images to images that are saved on your server. What's even better is that it can save several different sizes of the same image to take advantage of the HTML 5 image srcset feature which allows browsers to download the image size that is most appropriate for the user's device. In most cases you will want to use the image_sizes model to define a sizes definition that can be used by all of your wysiwyg pages. You may want several different image_sizes depending on the different image sizes and responsiveness you require.
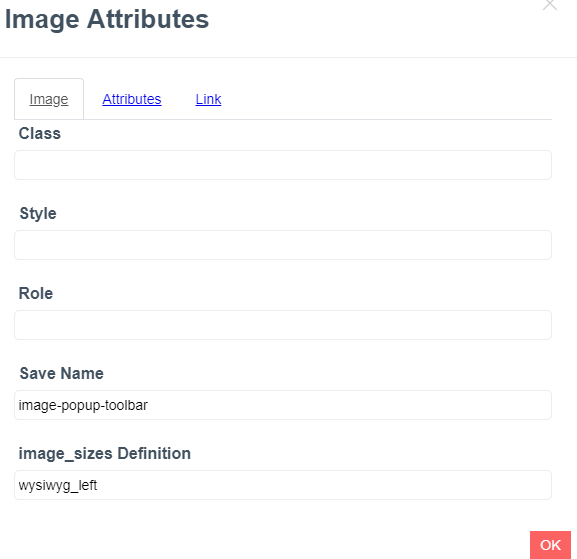
Notice on the above attributes tab we have given the "data" image a Save Name. This instructs the editor to save the image using this name and to change the source reference to use the saved image. By default, the Style attribute will be set to specify the width of the image. In most cases you will want to remove this styling so that the image width is either assigned using a Class value on the image screen above or on a style associated with the images_sizes definition. If the wysiwyg file that you are editing is nested in a folder, you can use = in the image Save Name in place of the folder path. For example, if your current specification is to be saved in folder help/model you could use =/some-image-name to save the image under help/model/some-image-name.
When stowing your wysiwyg definition, be sure to make note of any messages that are shown since these will alert you to potential problems.

Configuring Image Quality
As you have learned, images can be created by the wysiwyg editor by converting pasted images into saved images. Since the number and size of images often plays a significant role in the performance of web pages it is important to be cognizant of the size of images you are rendering. Size has two connotations in this context:
- The visual size of the image (on the screen).
- The data storage size of the image when saved on disk.
These are somewhat related in that images that are visually large tend to take up more disk space and vise-versa. Nevertheless, there are techniques that can be applied to reduce the disk size of images without degrading the visual appearance of the images. By shrinking the disk size of your images, the pages that render these images will load faster and these pages will use less bandwidth on your server.
The recommended method for optimizing the disk size of images is to use the third-party tinify api. This can be done seamlessly by configuring GenHelm to call this API when generating images. To use this approach, begin by configuring the tinify API as outlined in the image model help. Once you have configured your tinify API key you must indicate that tinify should be used during wysiwyg editing. This is done by editing site_settings and adding the following configuration:

This setting applies to both the wysiwyg model and database driven blog editing using the function blogadmin/edit-posts.
There are a few minor downsides to using tinify to shrink images rather than the default image compression however these are generally offset by the benefits of improved image quality and performance. The main disadvantages to using tinify are:
- You will only be able to save posts or use the WYSIWYG model if you are connected to the internet.
- Stowing posts containing new images will be somewhat slower and will use internet bandwidth.
- If you compress more than 500 images per month you will need to register a credit card with tinypng.com and you will incur minor charges for image compression.
If you don't want to use the tinify API, you can still use this setting to configure the quality of your images by entering a number from 1 to 100 in the Value column. Higher numbers should render higher quality images; however, these images will tend to be larger and result in slower page loads. The default value is 35 if this setting is not configured.
$functions
The wysiwyg editor includes full support for $functions. These can be interspersed with normal text to support more advanced and dynamic content creation. ctrl+g can be used to help edit the dollar function content if needed.
Adding Larger Tables and Updating Tables
The table dropdown allows you to insert a table that is up to 10 x 10 cells. If you need a table that is larger than this perform the following operation.
If you need more then 10 rows but no more than 10 columns, insert the table with 10 rows then go into code view and find the html source for the table. Copy a section that starts with <tr> and ends with </tr>. Repeat this as many times as needed.
If you need more than 10 columns, we recommend just adding one row initially then copy a section that starts with <td> and ends with </td>. repeat this as many times as needed to reach the number of columns you need. Then copy the entire table row as many times as needed.
Using <, >, & and $ Characters
Since < and > are special html characters, the use of these characters within your text content is strongly discouraged since these characters may interfere with or alter the html that is generated behind the scenes. $ characters can also be problematic since these may cause strings to be interpreted as dollar functions. If you enter an HTML entity, this will normally be converted to the corresponding entity character. In order to avoid these interpretations please use the special placeholders shown below instead or the <, >, $ and & symbols.

Rendering Sample Code
It is common for code samples and examples to contain a lot of special characters. As such, extra precaution should be taken when including sample code. There are two recommended methods for embedding sample code.
- Define the sample code using the codesample model.
- Use a special wysiwyg-code converter page to escape special characters.
Using the codesample Model
The best way to standardize the look and feel of code samples throughout your site is to define all of your code samples using the codesample model. The advantage of this approach is that you don't need to define any special characters within the wysiwyg editor itself. Furthermore, this method makes the code samples more readable using enhanced syntax coloring. After using the codesample model and stowing a sample, you can embed this into the wysiwyg editor or any other page by using the $codesample function. You might want to use the Code or Quote styling on the $codesample function to help the function stand out in the editor. These styles will be automatically stripped (as well as paragraph, bold and italics) when the HTML is generated for the target page.
As you can see from the image below, the code samples really stand out nicely when you use this method.

Escaping Special Characters
If you prefer to show code samples inline you must escape any special characters. One of the pages available within system is named wysiwyg-code. Since this page is in system it can be used by any site. This page can be used to automatically convert references from the <, > and $ symbol to the expanded representations as shown here:

Simply type or paste in the code that contains special symbols and click the Convert For Wysiwyg button. This will generate "safe" code that you can copy and paste into the wysiwyg editor. Other models can also use this form to covert these special characters to corresponding HTML entities.
Adding Internal Links
HTML documents may contain internal links that allow users to jump to a specific section of a document. The wysiwyg editor does not offer an automated way to add such links however if you enter the link using HTML syntax at the desired location this link will be preserved within the HTML. You must switch to Code View before adding the link. These anchors are added using the following syntax:
<a id="name_of_anchor"></a>
With this link in place, other pages can refer to the anchor id to link to a specific section of this document. This is done by passing the anchor id prefixed by a # character in the query string. For example:
$link(some-page,#some-anchor-id,Link Text)
Special Ctrl Functions
Certain keyboard key functions can be used to perform special handling. On a PC, these are implemented using the Ctrl key. On macintosh computers these are implemented using the Cmd key. Here is a summary of these:
| <ctrl>+z | Undo the latest action |
| <ctrl>+y | Redo the latest action |
| <ctrl>+b | Make the currently selected text bold |
| <ctrl>+i | Italicise the currently selected text |
| <ctrl>+u | Underline the currently selected text |
| <ctrl>+backslash | Remove formatting |
| <ctrl>+0 | Format as standard paragraph |
| <ctrl>+1 | Format as header 1 (h1 tag) |
| <ctrl>+2 | Format as header 2 (h2 tag) |
| <ctrl>+3 | Format as header 3 (h3 tag) |
| <ctrl>+4 | Format as header 4 (h4 tag) |
| <ctrl>+5 | Format as header 5 (h5 tag) |
| <ctrl>+6 | Format as header 6 (h6 tag) |
| <ctrl>+<enter> | Insert a horizontal rule (line generated by the HTML <hr> tag |