The form model is an incredibly powerful component within the GenHelm arsenal. It is used to create pages that include HTML forms used to gather input from the user. Forms offer a great deal of built-in functionality that would normally involve complex server-side coding. In order to facilitate field alignment, forms are based on the table model which generates HTML tables.
Integrated Components
Many models integrate with and support the form model. Here we summarize the other models that have a strong connection to the form model:
| form_handler | Used to code PHP which interacts with the form, for example to validate the field values and handle button functions. |
| transaction | Can be used to manage the navigation between several forms and to perform processing, such as saving files and/or sending emails after the user has iterated through a set or form pages. |
| html_field | Can be used to pre-configure fields (HTML Controls) to be added to forms. |
| html_field_type | Used to define common classes of html fields. |
| messages | Can be used to externalize message text so that messages can be shared and translated into multiple languages. |
| translations | Can be used to define translatable text to be used as form labels and other text values. |
| mailform | Can be linked to a transaction definition to allow the contents of a form to be sent as an email. |
| db_object | Forms are often created to interact with database tables encapulated by the db_object model. |
Most if these related models are not required when using the form model. The one exception is that there is no value in creating a form that does not have either a form_handler or a transaction linked to it since, in such a case, the form would not serve any purpose. The only exception might be if you plan to implement all of the form logic locally using JavaScript.
Form Properties
Here we see the optional properties of a form.

Let's review these form properties.
Translation Class
The GenHelm framework allows for the same exact form to be rendered in different languages by integrating with the translation model. To use this feature enter the name of the translation definition which contains the labels and other translations to be used on the form. When using translations, you must not define your fields with the *label property since the labels specified using this property will override the labels defined within the linked translation definition.
Default Label
As we describe below, :: can be entered in the cell to the left of a field value to indicate that this cell is to contain the label for the adjacent field. The value of this default label is controlled by what you enter in this Default Label field. You can enter one of the following values in the Default Label property:
: (colon)
The label will be defaulted to the label indicated in the translation definition.
? (question mark)
The label will default to the label in the linked translation definition and this label will also include popup help information taken from the info_head and info_body columns.
_ (underscore)
The label will default to the field name with underscores converted to blanks and converted to mixed case.
Form Handler Class
Enter the name of the class that will be used to supply code that interacts with the form. See Making Forms Functional below.
Form Handler Parms
This field is generally only used when you want to implement generic form handlers that are used by several different forms. In such a case you can pass a json formatted set of parameters to the form handler class to control its behavior. Refer to the form handler help for mode details.
Transaction
Transactions are defined using the transaction model. These are used to control form navigation (using previous and next buttons) and to perform automatic processing at the completion of a series of forms.
Group Label
Group labels define the text to introduce the fields of the form which are grouped into a fieldset. If you want the text to be dynamically translated you can refer to a translation object which points to a field reference as shown in the form above. Group labels can also contain dollar functions.
Table Properties
Form fields are organized into table cells to facilitate alignment. Use this field to set any properties to be used by the table.
Empty Cell Handling
By default, cells left empty will be ignored. For example, if you leave a cell in column 1 empty and enter a value in the adjacent cell in column 2, the value will actually end up in column 1 of the rendered HTML table. If you don't want this behaviour you could enter a into the cell. This default behaviour can be changed by setting the Empty Cell Handling property to one of these values:
colspan
When a cell is followed by one or more empty cells (to the right), a colspan property will be added to the cell to "consume" the empty cells.
empty
Use this value to force empty cells to be rendered as empty cells in the generated HTML table.
nbsp
Use this setting to automatically populate empty cells with a non-breaking space to force these columns to be rendered.
=value
If this option contains a value that begins with an equal sign, the specified value (after the equal sign) will be automatically placed in the empty cells when the table is rendered.
Field Definitions
This can be the name of a class that implements a field_definitions method which provides properties to define the form fields. This is usually the name of an object generated by the db_object model or the model_model. On rare occasions you might want to embed a form within another form, while at the same time supply an alternate field definitions object. This can be achieved by passing a field_definitions parameter to the embedded form as shown here:

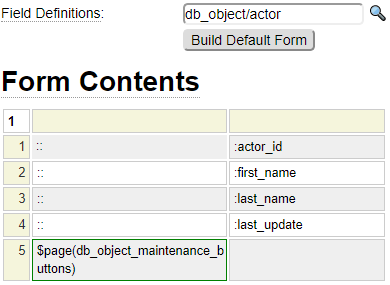
Build Default Form
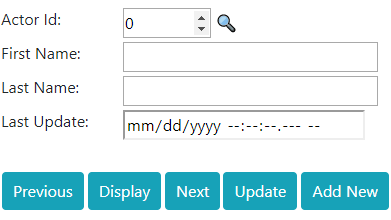
If your form is linked to a Field Definitions class, you can use this button to automatically generate a sample form.
Adding Fields to Forms
Fields are added to forms by entering the field name preceded by a colon. For example, entering :first_name into a table cell tells the runtime builder that this value is to be substituted by the HTML field named first_name.
Configuring Fields
There are four ways to configure fields. All four ways can be used on any given form.
1. Configuring Fields On-the-fly
If you only plan to use a certain field definition once or twice, you can configure the field when you add it to the form by following the field with a slash followed by json properties to define the field. For example,
:first_name,type:text,size:20
The json parameters can include any valid attribute for the type of field being configured. There are also some special attributes that start with an asterisk (*) that we will learn about later. Often the same or similar fields are used on many different forms and you will want to use one of the other methods to define the fields so that these definitions can be shared across different forms or sites.
2. Defining Field Types
Field types are created using the html_field_type model. These allow you to define a common set of field properties that can be shared. One of the required properties of a field type is the implementation type. For the most part, implementation types correlate directly to native HTML field types, however, there are some implementations that go beyond what is naively supported by HTML. For example, you can implement a field as a flexgrid in order to input a "spreadsheet like" control.
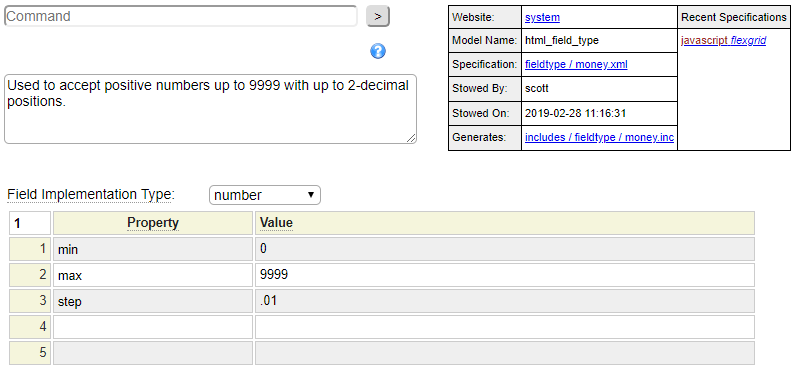
In this example we see the definition of a field type named money. If we want to add this definition to a field we can do so by using the *based-on property. Recall that an asterisk indicates that based-on is not a "real" html property but rather something used by the form runtime. Here we see an example using this property.
:donation,*based-on:money
We can even extend or override the properties defined by the field type. For example
:big_money,*based-on:money,
max:20000,required:true
Field types can be defined within the current site if they are not generic enough to use more globally. In most cases you will want to define these within the system site so that they can be shared across all of your sites.
3. Defining Field Definitions
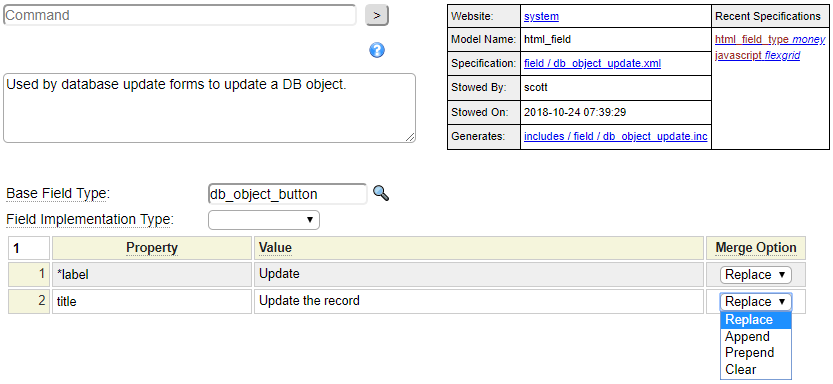
Field definitions are created using the html_field model. These can be based on a field type definition or can be based on a native html type. When supplying properties at the field level you can indicate whether you want to replace like-named properties defined on the inherited field type. You can also supplement or clear properties defined by a field type.
Fields can be defined within the current site for use throughout the site or in the "system site" in order to make the fields accessible from any site.
When a field definition is defined, you can simply refer to the field name without any other properties as in:
:db_object_update
Alternatively, you can override or supplement the properties by adding a slash and a series of json formatted properties as in:
:db_object_update,
onclick="updating = true;"
If you want to use a field definition on a field with a different name you can use the *extends property. For example:
:my_update_button,*extends:db_object_update,
*label:Commit
4. Using a Definition Class
The form model allows you to enter a class which can be used to supply field definitions. Normally this class is generated using either the db_object model or the model model.

These classes implement field_definitions methods to supply the form with field properties.
Review of Field Implementation Methods
Consider the form below.
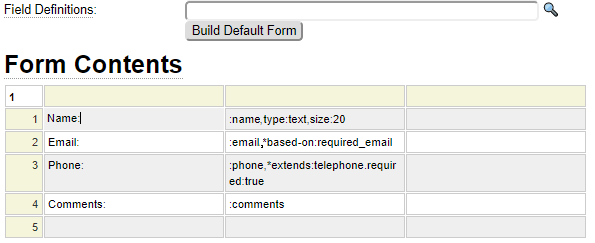
Since the Field Definitions value is empty we must define all of the fields by one of the other methods. Let's review how each of these fields is defined:
- Since the name field includes the type property, this field is configured entirely on-the-fly.
- email uses the *based-on property so there must be an html_field_type definition called required_email either in the current site or an inherited site.
- The phone field extends another field so there must be a pre-existing html_field definition called telephone. This could be in the current site or an inherited site.
- The comments field contains no configuration so there must be a pre-existing html_field definition called comments.
Labels and Prompts

Field prompts or labels can be typed into the cell directly before (or after) the field using normal text. Although this is the easiest method there are other methods that allow the labels to be shared and translated if necessary. Instead of typing prompt text in the cell immediately preceding a field (one cell to the left), you can type two colons (::) as a label placeholder for the field. By default, this placeholder will be substituted by the immediately following field name converted to mixed case with underscores replaced by spaces, and followed by a comma. Next we will learn about some alternative means for assigning the :: placeholder.
Adding a *label property
A label can be added as a field property named *label using any of the configuration methods described above. If available, the *label property will be used to replace the :: placeholder contents. For example, a form defined like this:

Will be rendered like this:

Using Translation Classes
Translation Classes serve three main purposes:
- They allow labels to be shared across several forms.
- They facilitate the addition of extensive field descriptions to help users understand the purpose or use of a field.
- They allow labels and descriptions to be translated into different languages.
Consider the following translation definition defined using the translation model.
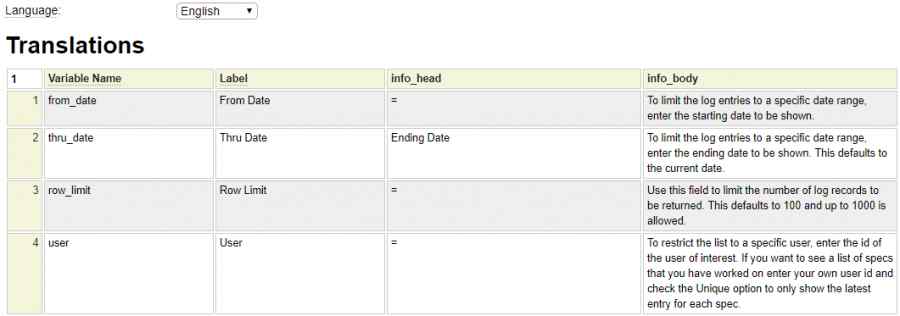
Here we can see that the translation definition contains one row for every field that we want to translate. Column 2 contains the value to be used as the label for the field (in the language associated with the definition). In order to facilitate drop down field help, column 3 must be defined with a heading info_head and column 4 must be defined with a heading info_body. These columns allow you to make the labels clickable in order to provide a description of each form field as shown below:

The info_head column defines the contents to be shown at the top of the dropdown. Often this value is the same as the label for the field and, if so, you can use an equal sign (=) to indicate that the label value should be used.
Linking Translation Classes to the Form
The form definitions contain two fields that allow you to link in a default translation class to be used for the form:

The Translation Class is used to supply the name of the translation definition. The Default Label field should contain a question mark (?) if your translation definition includes the info_head and info_body columns. If you don't want to provide help for each label use a default label value of colon (:). In such a case, the labels will not offer the drop down help feature. You can override the translation class at the field level by using the field property *translation-class.
Translating Placeholders
In addition to prompts/labels, in-field placeholders can also be translated. To do so, make sure the form or field references a translation class and set the placeholder property to ? as shown here:

In this case, the placeholder value will be taken from a column titled placeholder in the linked translation class. Here is an example of a translation class containing some placeholders:

Translating Balloons
The *balloon property is used to add an icon to a field to provide additional information about the field as show here:

If the field references a translation class or is contained on a form that does, you can use *balloon:? to pull the translation text from the linked translation class.
Translating Miscellaneous Text
Notice that the above translation definition contains a variable named optin_form. Assuming this definition is called optin, this can be translated using the dollar function $translate(optin,optin_form). If you wanted to associate help with this string you would need to add info_head and info_body columns to the translation definition and you would use the alternate dollar function $infolabel(optin,optin_form).
To switch languages on your page, refer to the dollar function $language_links. To translate values into another language refer to the translate model.
Other Field Properties
There are close to 100 different properties that can be associated with a field. This includes any valid property can be assigned to an HTML field. These properties can be inherited from html_field_types using the special *based-on property or you can extend an field definition using the *extends property.
Some HTML properties represent boolean conditions, for example readonly and disabled. When expressing these in json format you should use the form property:true or property:false. If a property value contains commas or spaces you should enclose it in single or double quotes making sure that the property value itself does not contain the same quote that is used.
In addition to native HTML properties such as class, title, onclick, etc. there are many special properties that go beyond what is supported by HTML itself. These pseudo properties all begin with an asterisk to differentiate them from native properties. Here is a list of these Special Field Properties.
One set of advanced properties deal with helproutines. These allow you to link an input form to popup help pages that allow the user to select values to be returned to the opener form. Follow this link to learn about setting up helproutines.
Defining Cell Properties
Just like the table model, cell properties can be assigned by clicking in a cell and using Ctrl+space. You may need to click in the field twice slowly (so that it is not treated as a double-click) prior to pressing the Ctrl key and the spacebar.
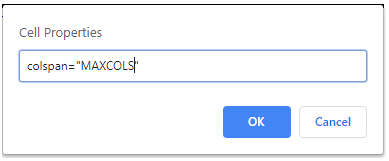
Notice that we used a special keyword MAXCOLS here to represent the total number of columns remaining in the current row. Use this feature if you know you want a cell to occupy all remaining columns. This way you don't have to adjust the number if you later introduce more columns. MAXCOLS can be used in any column and automatically adjusts to reflect the number of columns to the right plus 1 (to include the current column).
Row properties can be added by clicking on the row number and choosing Row Prop. Column properties can be entered by clicking on the column heading then clicking the ... and choosing Column Prop.
Nesting Forms
Forms are just like any other page (or page component) and can be nested to any depth by referencing $page(subform_name) within a given form. Here we see a form with several sections (fieldsets). Each fieldset can have a label to introduce the fields.

This is the main page definition for the form above:

Notice that we can combine individual fields and fieldsets (nested form pages) on the same form. We have used cell properties to set the colspan on the fieldsets to match the number of columns of the individual fields. Instead, we could have simply set the "Empty Cell Handling" property to colspan.
There are a few areas of interest in the Tarp Color section of the form so let's take a look at this in some detail. First you will notice that the color selection is implemented using a series of radio buttons. This is a good use case for the html_field_type model since each button has the same set of common properties. Here we see the definition for html_field_type called tarp_colour.

Notice that the *suffix property has been set to the special keyword =Value. This allows us to set the suffix of the fields based on the value of each radio button. Three separate case substitutions are possible:
- =value: Use the value property as is
- =Value: Use the value property converted to mixed case
- =VALUE: Use the value property converted to upper case
We have set the required property on the field type to indicate that a color must be selected. We have also coded an onchange function that will be used to show the selected color to the right of the radio buttons. If we want to default one of the radio buttons before the form is presented, the *radio-value property would be set to the value property of the button to be selected by default. For example, adding *radio-value:red on any one of the colour radio buttons would cause the red radio button to selected when the form is first loaded.
This is the form definition that utilizes this field type:

Notice that each radio button has the same field name (colour) and is based on the tarp_colour html_field_type. The only unique property that needs to be assigned to each button is the value property.
On the right side of the form we see that there is an empty cell that contains a non-breaking space. We hover over the cell to show the field properties. An id has been assigned so that we can style the field and set its background-color when the user makes a color selection.
We have added a hidden field to the form named colour_message, this is used to provide a location for the form handler to set a message that related to the color selection.
Finally, notice that we also use the $property function to define the onload property of the body tag. The body tag could have other onload events designated so we pass a + sign to indicate this event should be added to the end of any existing events.
Handling Repeating Form Fields
There are several ways for dealing with form fields or sections that repeat. Here we discuss the main ways that this can be done.
Repeating Fields
We have already seen an example of repeating fields in the color form above. This happens to be a radio button field which always repeats but the same concept applies to any field. For example, this form (section) would allow the user to enter the names of up to six children:

Repeating Groups
The flexgrid model can be used to define an input control similar to a spreadsheet that allows the user to insert and delete rows. Flexgrids can be added to forms just like any other fields.
Repeating Form Sections
The $for function can be used to repeat form sections if the number of sections is known in advance. Consider the following form section called tarpspec

Notice that the form has three fields, colour, width and height. Also notice that the Group Label references $function qsparm to show the item number.
Here we see how this form can be repeated three times in a parent form while passing in a value for the item parameter:

And here we see the resulting rendered form.

This technique would get a little tedious if the form component needs to repeat many times or if the actual number of repetitions is dynamic. To solve this problem we can turn to the use of the $for function. This is similar to a for loop in that it can repeat a block of code any number of times.
For example $for(1,10,%1 of 10<br />) would generate
1 of 10
2 of 10
3 of 10
etc.
Notice that the for loop iterates from 1 to 10 and %1 changes each time through the loop to reflect the current loop count. We can apply a similar technique to repeat a form section a variable number of times as determined by a session variable. Consider the following example which serves to replace multiple rows containing $page(tarpspec,item=n) where n increments by one on each row (as we showed above).

This looks a little bit scary so let's break it down.
- The first parameter to the for loop is simply the integer 1 to indicate our counter should start from one
- We are assuming that to total number of items has been saved in the session variable $_SESSION['items'] so we use $session to supply the total iterations of the for loop
- You might expect the third parameter to be simply $page(tarpspec,item=%1) we will discuss why we don't use this simpler form in the next section.
$function vs {DOLLAR}function
When $functions are passed as parameters to other $functions the normal behaviour is that the parameters are resolved first and then they are passed to the outer function. For example, let's say we have a certain date in a session variable, we could code a set of nested dollar functions such as:
$if($session(order_date),<,$date(,-7 days),overdue)
This function would render the string 'overdue' if the value contained in $_SESSION['order_date'] is earlier than 7 days ago. Obviously, in a case like this you want to compare the results of the $functions not the function strings themselves. On rare occasions, it is necessary to postpone the resolution of a $function until after a function has been called. This can be done by using {DOLLAR}function rather than the normal $function syntax.
In the case of our for loop this is necessary because the expansion of $page(tarpspec) differs depending on what came before it. Internally, if these functions are processed during the parameter evaluation stage, the function will not know that it needs to render the form fields as array fields. So the generated fields will look something like this:
<input type="number" min=".25" max="9999"
step=".25" name="width" id="number_width" />
In other words, the same field would be generated several times resulting in invalid HTML.
When we defer the evaluation of $functions, the resulting fields will be correctly generated as array fields such as this:
<input type="number" min=".25" max="9999"
step=".25" name="width[]" id="number_width0" />
There is one final nuance to be considered when using subforms that repeat on a variable basis. If the number of possible repetitions includes 1, you most likely want to treat the form fields as arrays even though there may only be one occurrence of the field for a particular situation. You can force a field to be treated as an array even though only one occurrence of the field is on a form by adding the property *repeats:true to the field. We recommend adding this property to all of the fields within a repeating form (tarpspec in our example) if there are situations whereby the form may only repeat once. This will help simplify the Javascript and PHP coding related to the fields since the code can deal with the fields as arrays even when only one occurrence is generated. The *repeats property is not necessary for forms that will always repeat 2 or more times.
Overriding Form Names
Most applications that make use of forms generally only have one (root) form per page (although this form may consist of several subpages/fieldsets as we have shown). When only one form is needed there is no need to override the form name since there is only one form tag on the rendered page so there are no conflicts. The default form name is inputForm.
If your page contains two or more root forms you will need to rename all but one of these (or all if you prefer) so that all of the forms have unique ids. Only the root form names need to be assigned since the subforms don't generate separate form tags. There are two methods by which forms can be named:
If the form is loaded using a $page tag, formname can be passed as a parameter to the page function as in:
$page(stripe_payment_form,formname=payment_form)
This form would be created from the GenHelm specification named stripe_payment_form and the form tag would start with
<form id="payment-form" name="payment_form" method="post"...
Another method of overriding the form name is to use the formname parameter within the internal Parameters of the form page as shown here:

Preserving Form Field Values
If you are just presenting a single form to the user, you generally don't need a way to preserve or restore the values on the form since these values are retained by the browser within the form itself. On the other hand, if you are presenting a series of forms and allowing the user to navigate between several forms you will need a way to save the values on each form so that when the user returns to a certain form it contains the values it had when the user left the form. In most cases this will be done using session variables. This capability is handled automatically when your form navigation is managed by a transaction definition using the transaction model. Follow the link in the next section to learn how this is done.
Other methods for retaining field values include:
- Caching objects in the session by using the persistent feature of the site's create_object method.
- Saving values in cookies using $setcookie and retrieving cookie values using $cookie.
- Saving information in a database or using sequential files.
Making Forms Functional
At this point we have learned how to define a form but the forms won't really do anything until we define what they are to do. There are basically two ways to make forms do something useful:
- Add a Transaction Definition to the form
- Add a Form Handler Class
- Using forms to update the database in conjunction with the db_object model
Follow the links above to learn about each of these methods.
Tabbed Forms
To learn how to make tabbed forms, please visit the boottab model help.